SWYFT Box Elevator: Assembly Guide
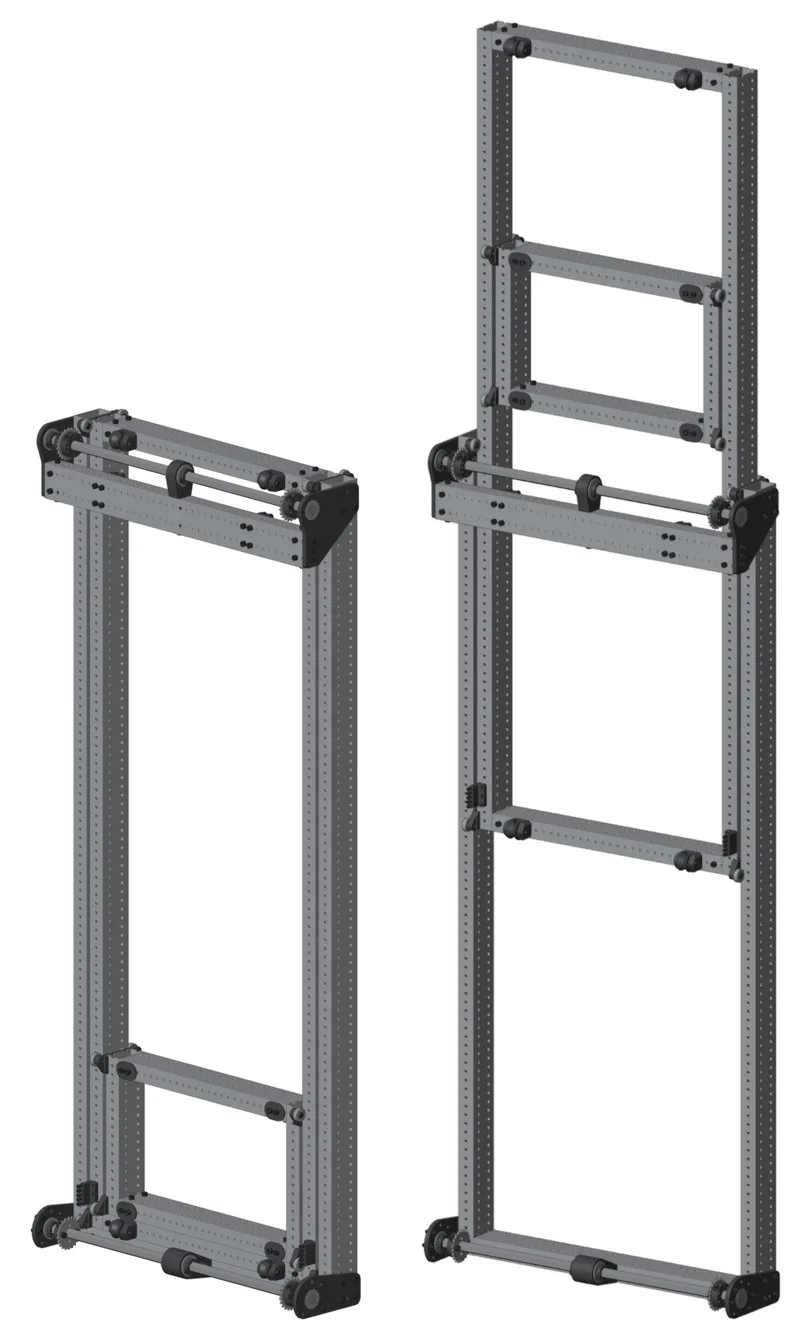
This guide covers building the frame of the SWYFT FRC Box Elevator (2-stage). It covers the frame, the axles and sprockets, the chains and the ropes.
| SKU | SR-BOXELEV-FRC-2STG |
| Frame | 2 in x 1 in aluminum tube |
| Stages | Outer stage, middle stage and carriage |
| Drive | Middle stage: two #25H chains. Carriage: two 4 mm ropes. |
Tools and supplies
| Item |
Notes |
| Allen keys |
Included |
| Wrench |
For holding lock nuts |
| 7 mm wrench |
For the chain tensioners |
| Blue Loctite |
For the screws in steps 1 to 11 |
| Vise or arbor press |
For pressing the bearings into the pulleys |
| Chop saw or band saw |
For cutting the tubes and axles |
| #25 chain tool |
For cutting the chain to length |
| Scissors |
For cutting the rope |
Before you start
- Loctite. Use blue Loctite on the screws in steps 1 to 11.
- Cut your tubes first. The guide starts with the tubes cut to length.
- Tubes and end caps. The base kit doesn't include tubes, end caps or axles. If you ordered the kit with tubes, they're in the box.
- The three stages. The carriage is the smallest frame. It rides inside the middle stage, which rides inside the outer stage. Each frame is two vertical tubes and two horizontal tubes.
Parts
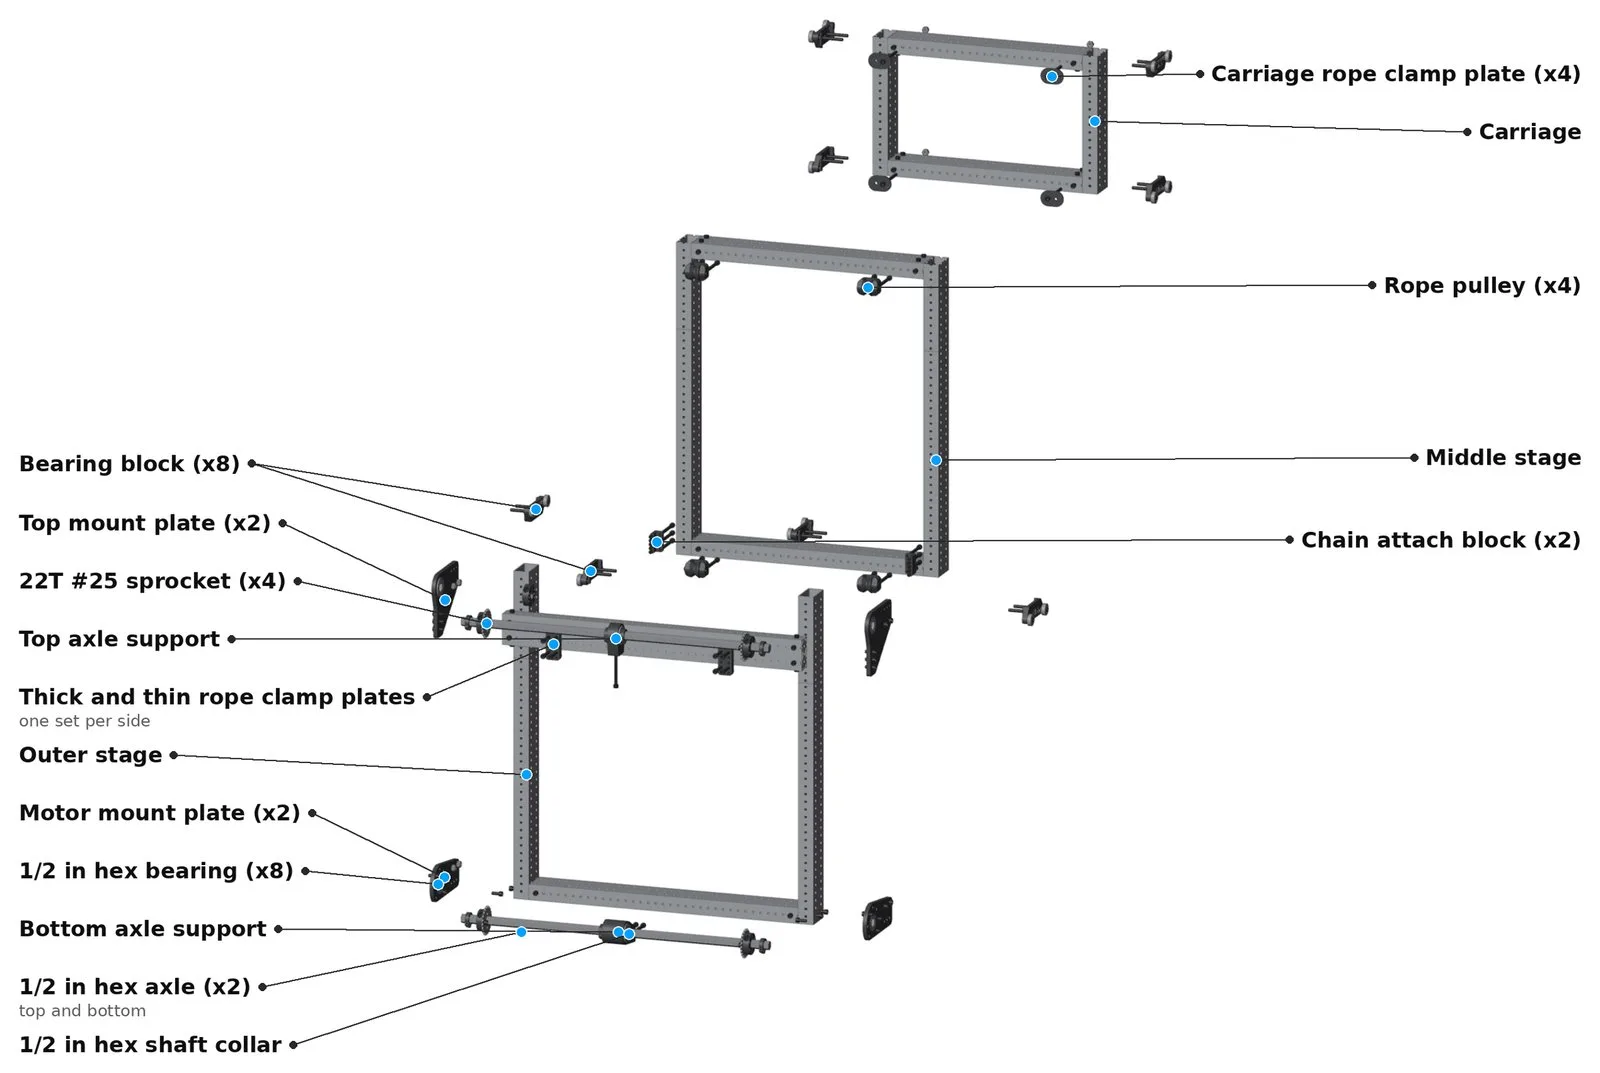
In the step pictures, blue = parts you add in that step and grey = parts already in place.
Bearing blocks
Step 1. Build the bearing blocks
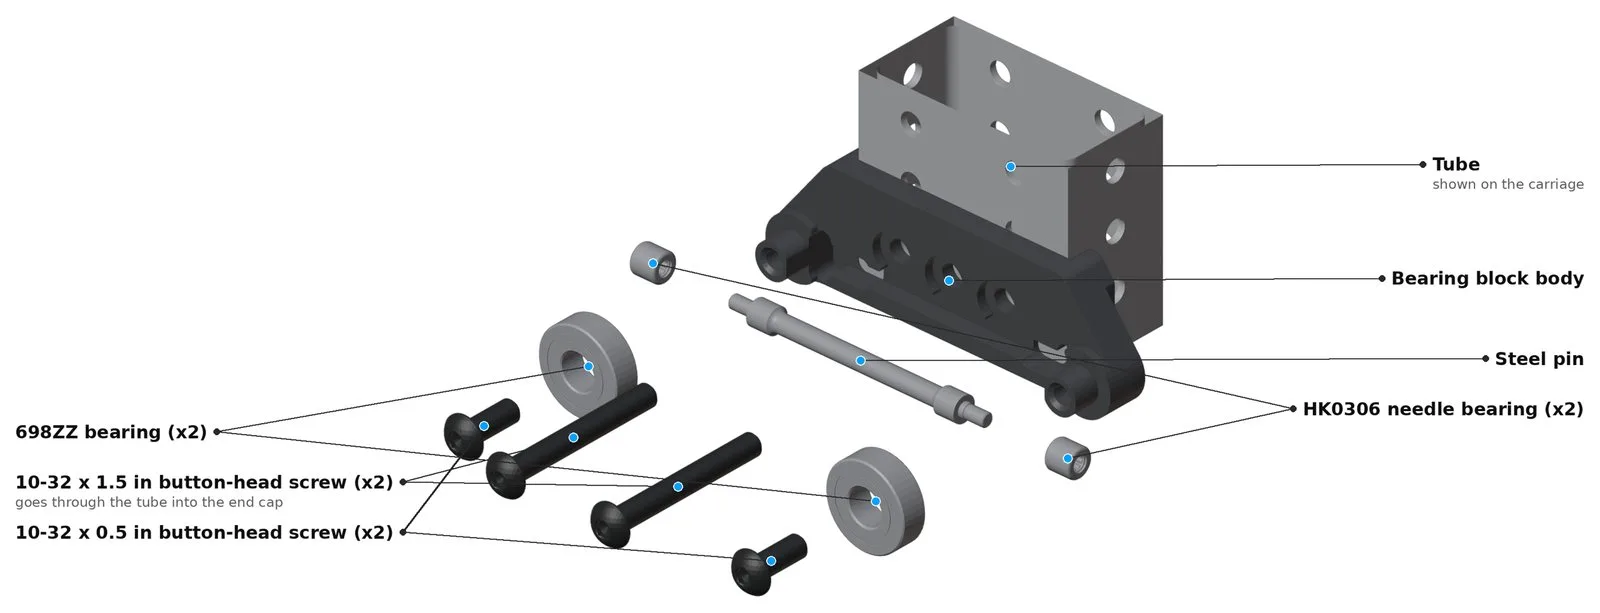
Each bearing block uses one block body, one steel pin, two needle bearings, two 698ZZ bearings and two 10-32 x 0.5 in button-head screws.
- Press a needle bearing onto each end of the pin until it's flush with the end.
- Push the pin into the block body.
- Put a 698ZZ bearing on each of the two posts on the block.
- Put Loctite on two 0.5 in button-head screws and screw one into the middle of each bearing.
Build 8 bearing blocks. Each one is held on the tube later with two 10-32 x 1.5 in button-head screws.
Build the carriage
Step 2. End caps in the inner horizontal tubes
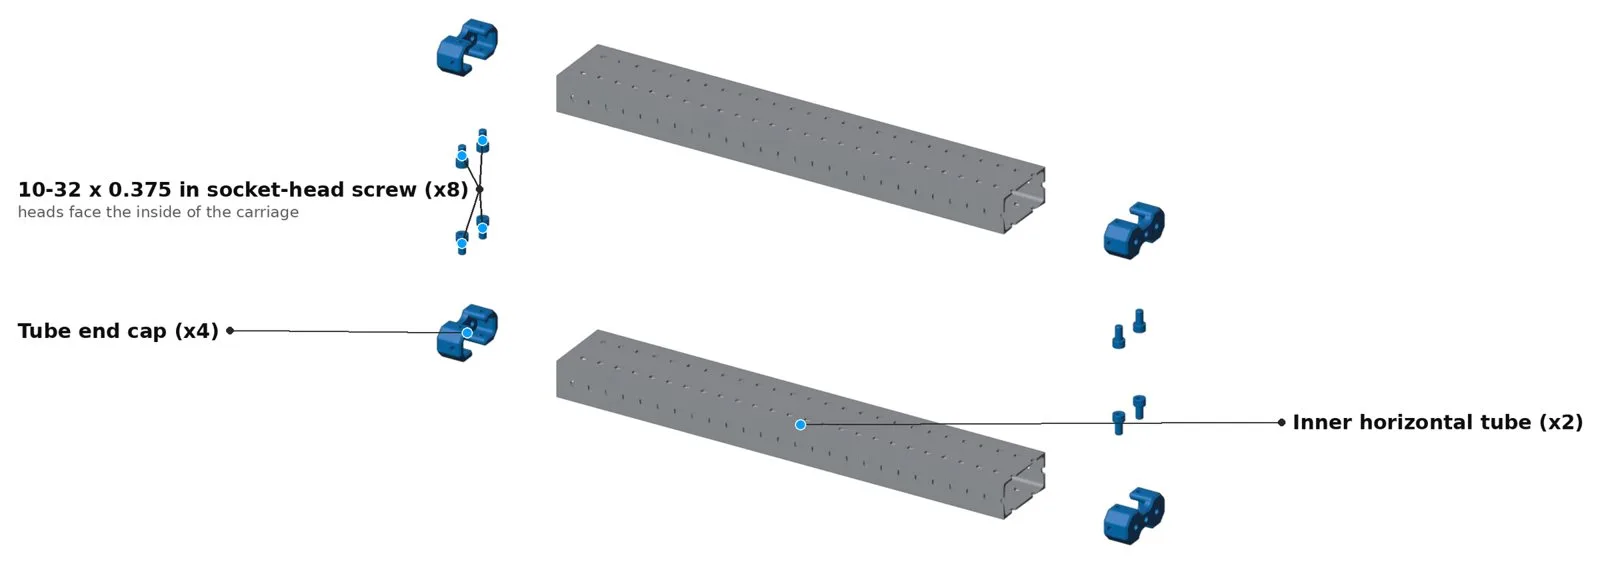
- Push an end cap into each end of both inner horizontal tubes.
- Fix each end cap with one 10-32 x 0.375 in socket-head screw (8 total).
The screw heads go on the side that faces the inside of the carriage: the top face of the bottom tube and the bottom face of the top tube. That way the carriage doesn't hit the top or bottom of the elevator.
Step 3. Bearing blocks and inner vertical tubes
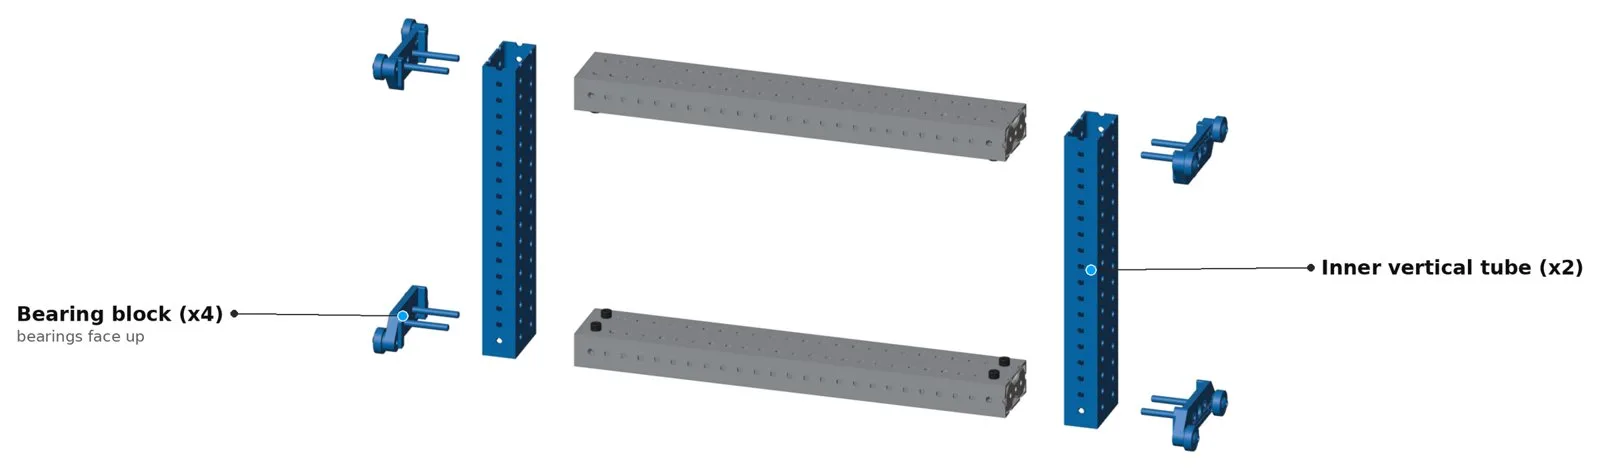
- Hold an inner vertical tube against the ends of the two horizontal tubes.
- Put a bearing block on the outside of the vertical tube at each end.
- Put two 10-32 x 1.5 in button-head screws through each block and the vertical tube, and into the end cap.
- Do the same on the other side. That's 4 bearing blocks on the carriage.
The bearings on each block face up and sit slightly past the end of the tube.
Build the middle stage
Step 4. Bottom of the middle stage
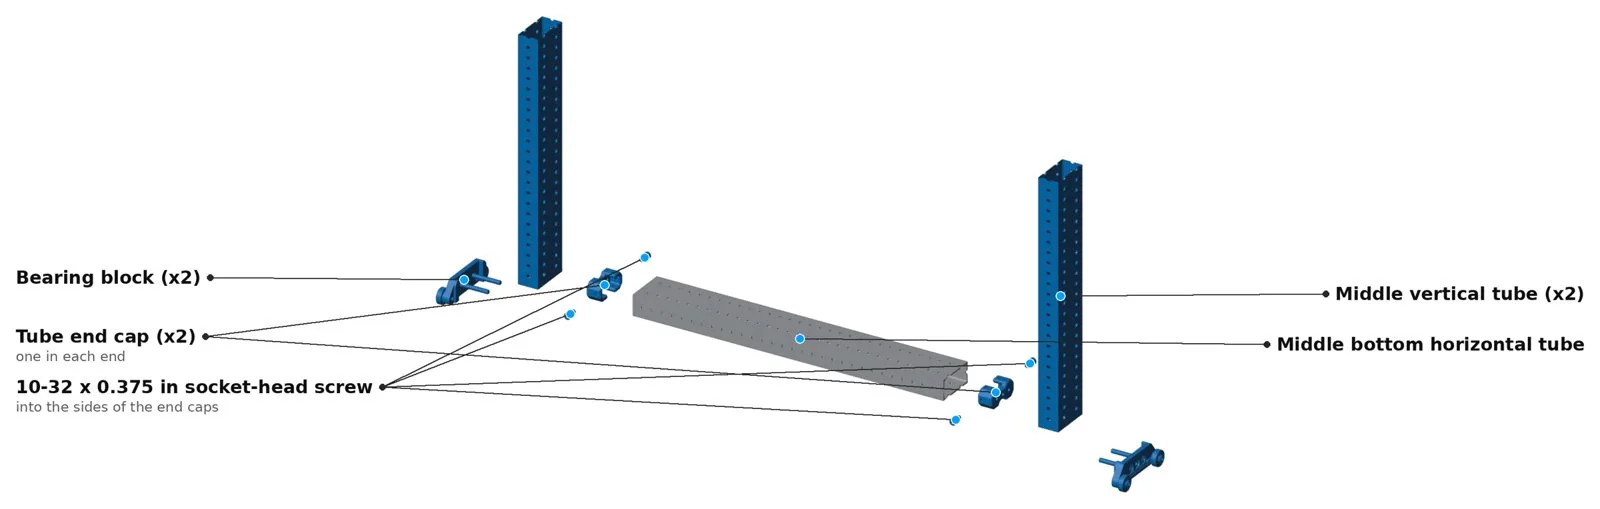
- Push an end cap into each end of both middle horizontal tubes. Fix each with one 10-32 x 0.375 in socket-head screw in the side of the tube, not the top or bottom.
- Put a middle vertical tube against each end of the bottom middle horizontal tube.
- Fix each corner with a bearing block and two 10-32 x 1.5 in button-head screws through the block and the vertical tube, into the end cap. The bearings stick out slightly past the bottom of the tube.
Step 5. Slide in the carriage, then add the top tube
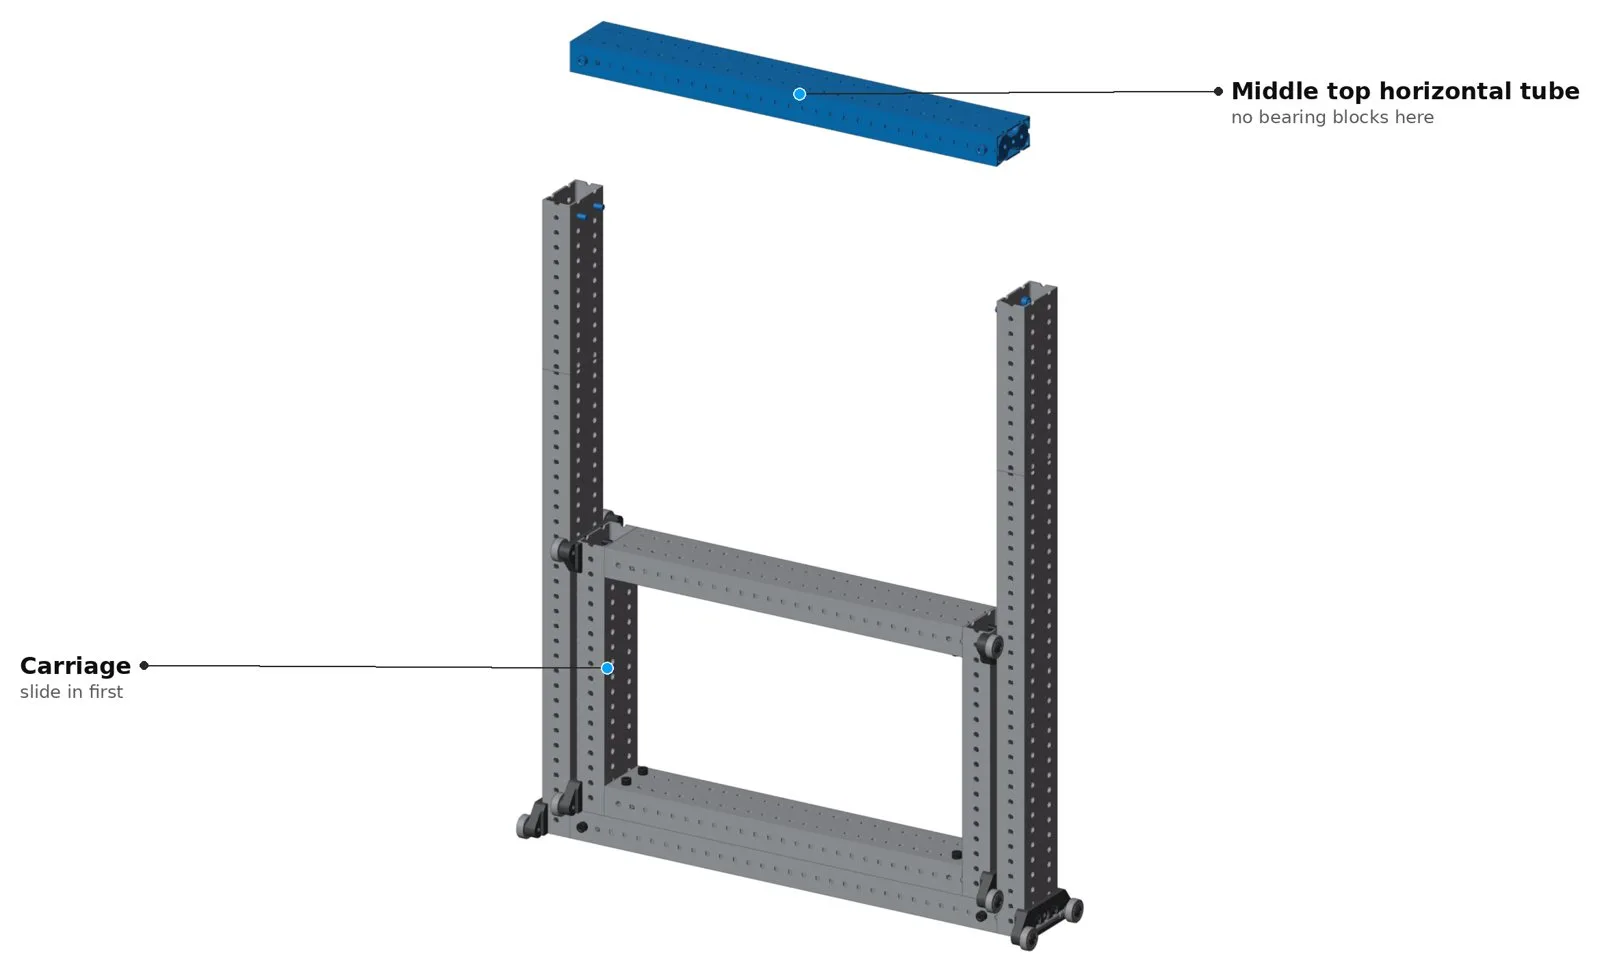
- Slide the carriage into the two middle vertical tubes from the top and all the way down.
- Put the top middle horizontal tube between the tops of the vertical tubes. There are no bearing blocks here.
- Fix each end with two 10-32 x 0.375 in socket-head screws driven from inside the vertical tube into the end cap. Reach in through the holes in the tube with the short end of the Allen key.
Check that the carriage still slides up and down smoothly.
Build the outer stage
Step 6. End caps in the outer horizontal tubes
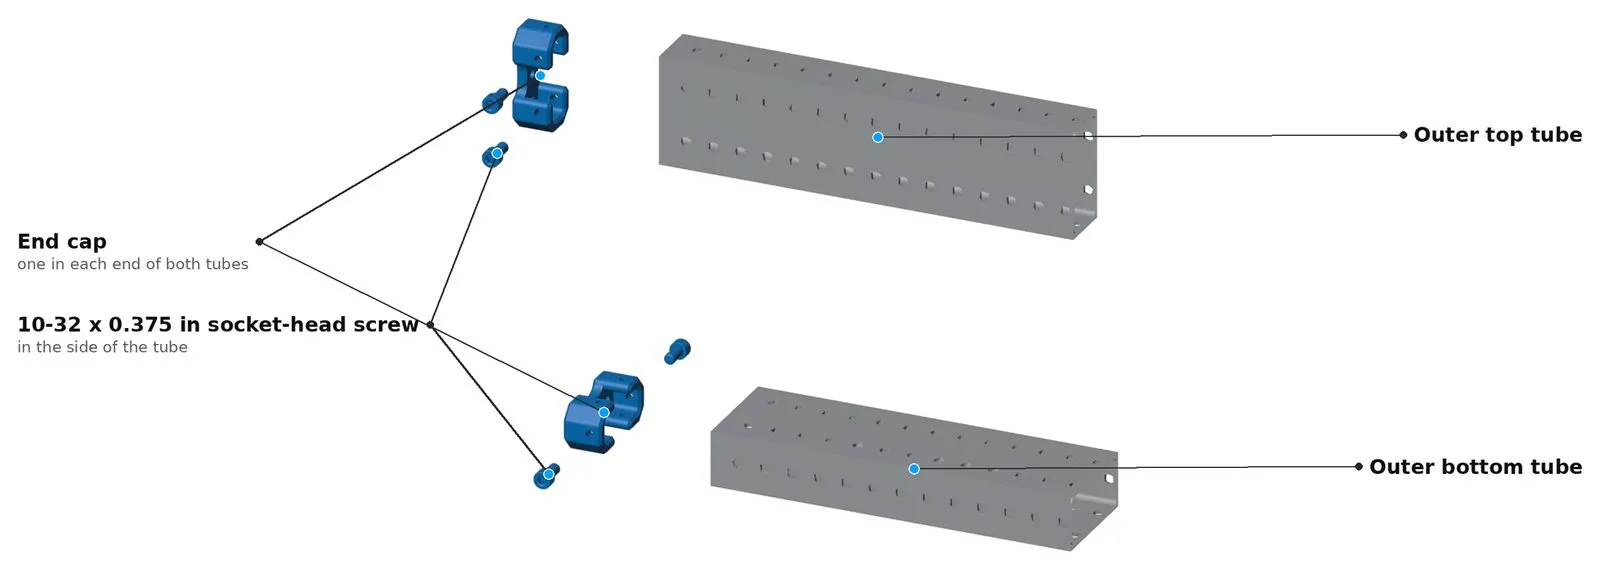
Put end caps in both ends of both outer horizontal tubes. Fix them with 10-32 x 0.375 in socket-head screws in the side of the tube, not the top or bottom.
Step 7. Plates on the outer vertical tubes
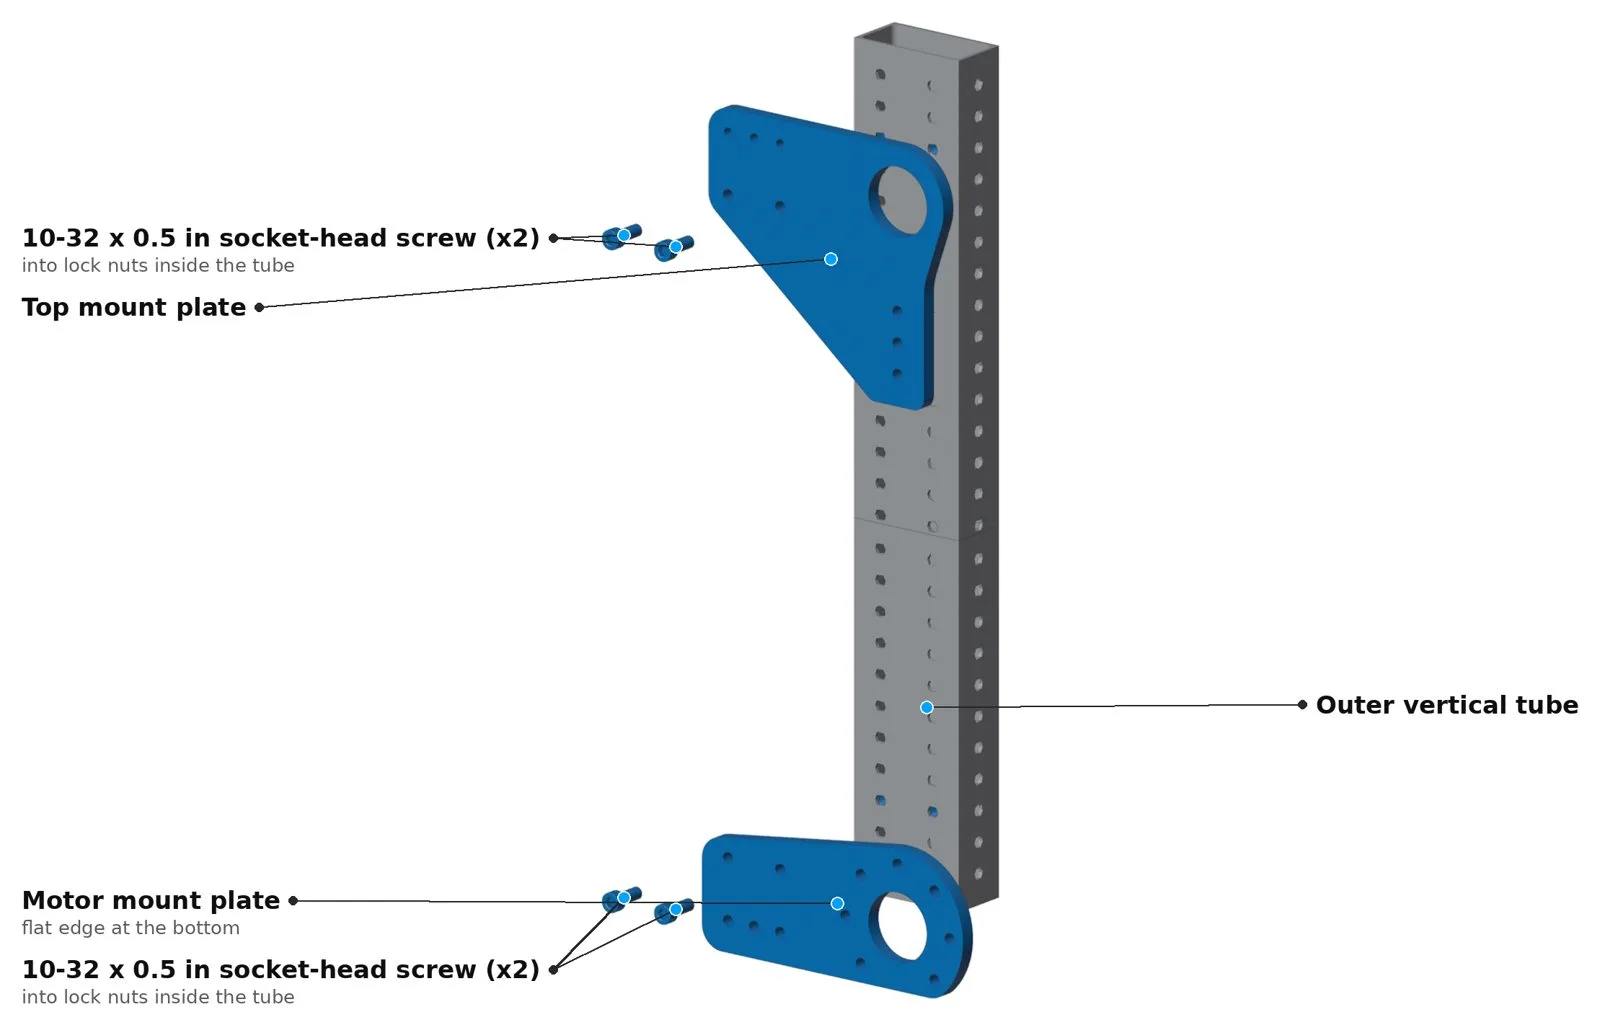
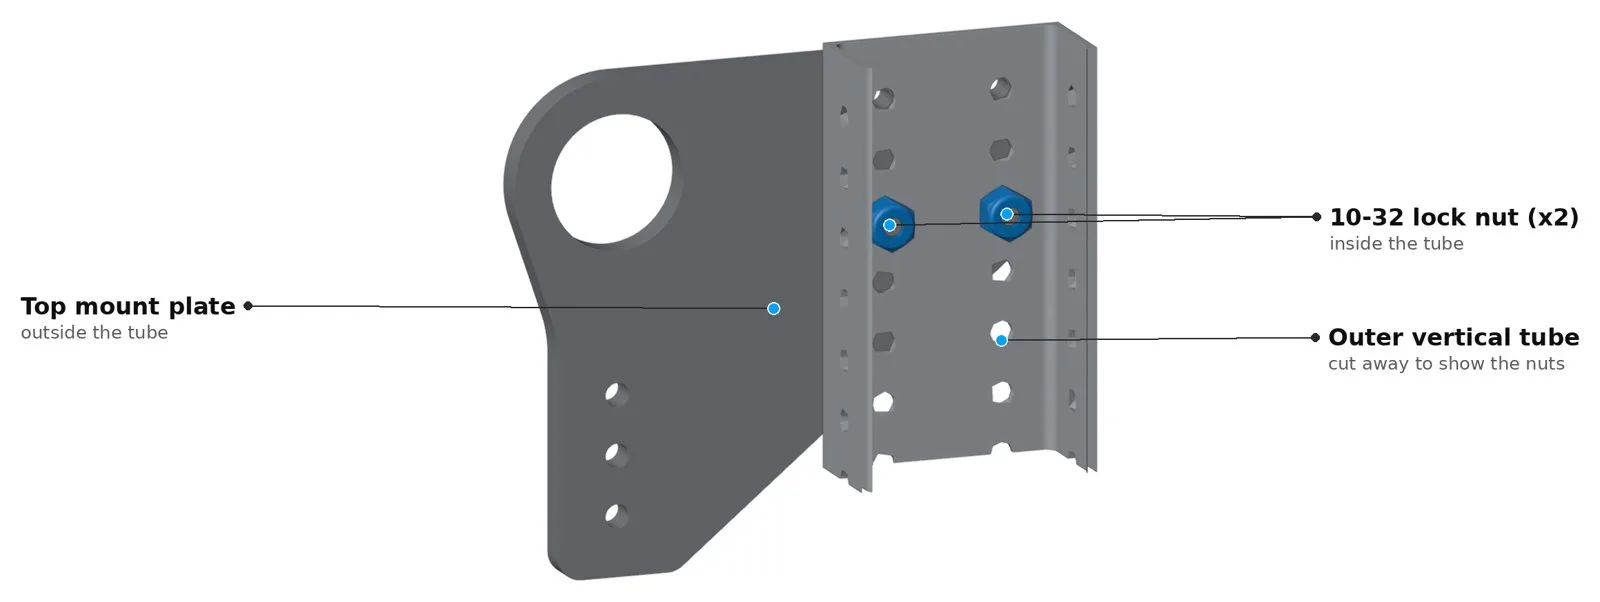
Each outer vertical tube gets a top mount plate at the top and a motor mount plate at the bottom. Each plate uses two 10-32 x 0.5 in socket-head screws and two lock nuts.
- Slip a lock nut inside the tube under the third hole from the end. The nuts go inside the tube and the plate goes on the outside.
- Line up the plate's two non-threaded holes with the tube holes, put a screw through, and start it into the lock nut by hand. Do the same with the second screw.
- Hold the lock nut with a wrench and tighten.
- The flat edge of the bottom plate goes at the bottom of the tube.
Build the second tube as a mirror image of the first, so the plates point the same way on both sides of the elevator.
Step 8. Top bearing blocks
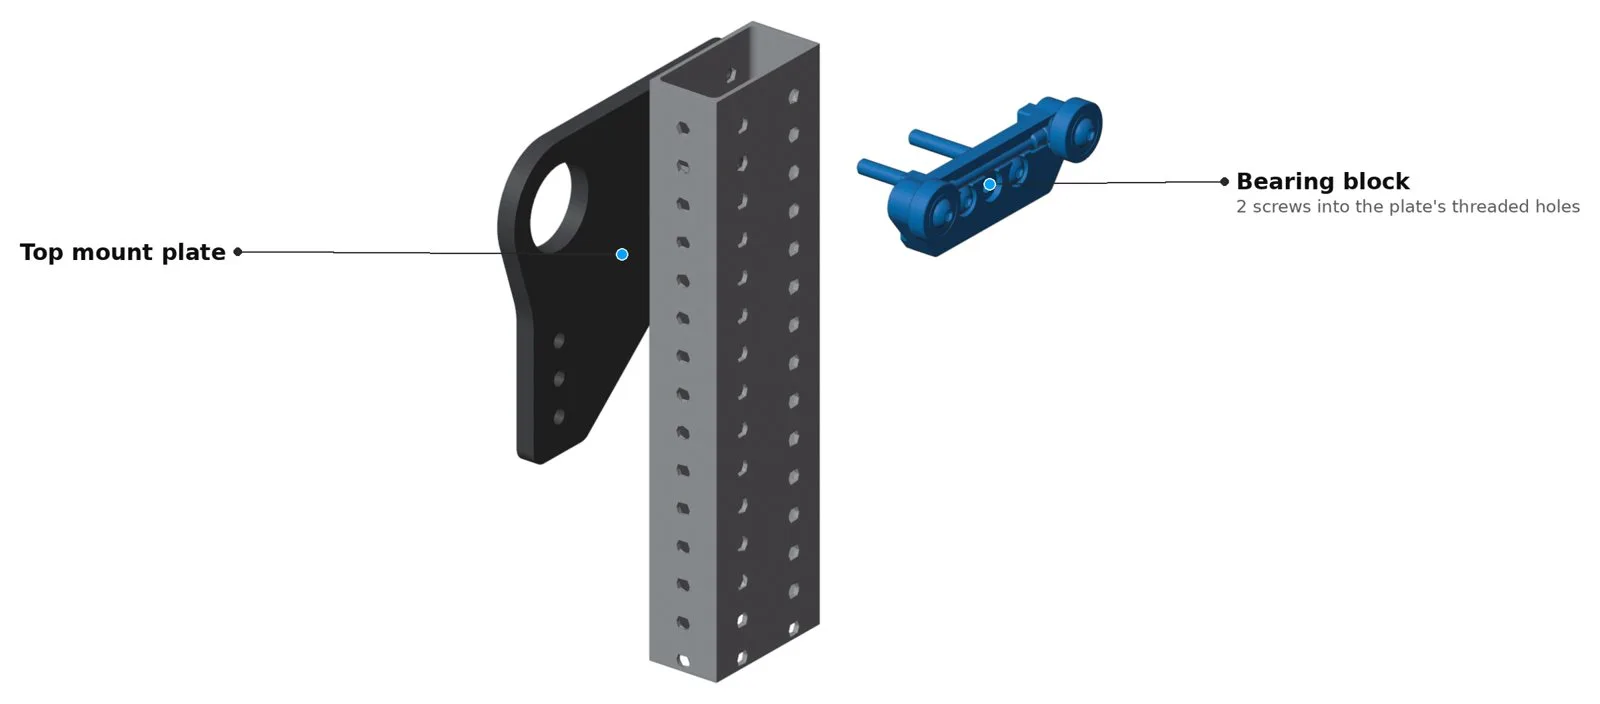
Put the last two bearing blocks at the top of the outer vertical tubes. Put two 10-32 x 1.5 in button-head screws through each block and the top two holes of the tube, into the threaded holes in the top mount plate.
Step 9. Slide the outer tubes on
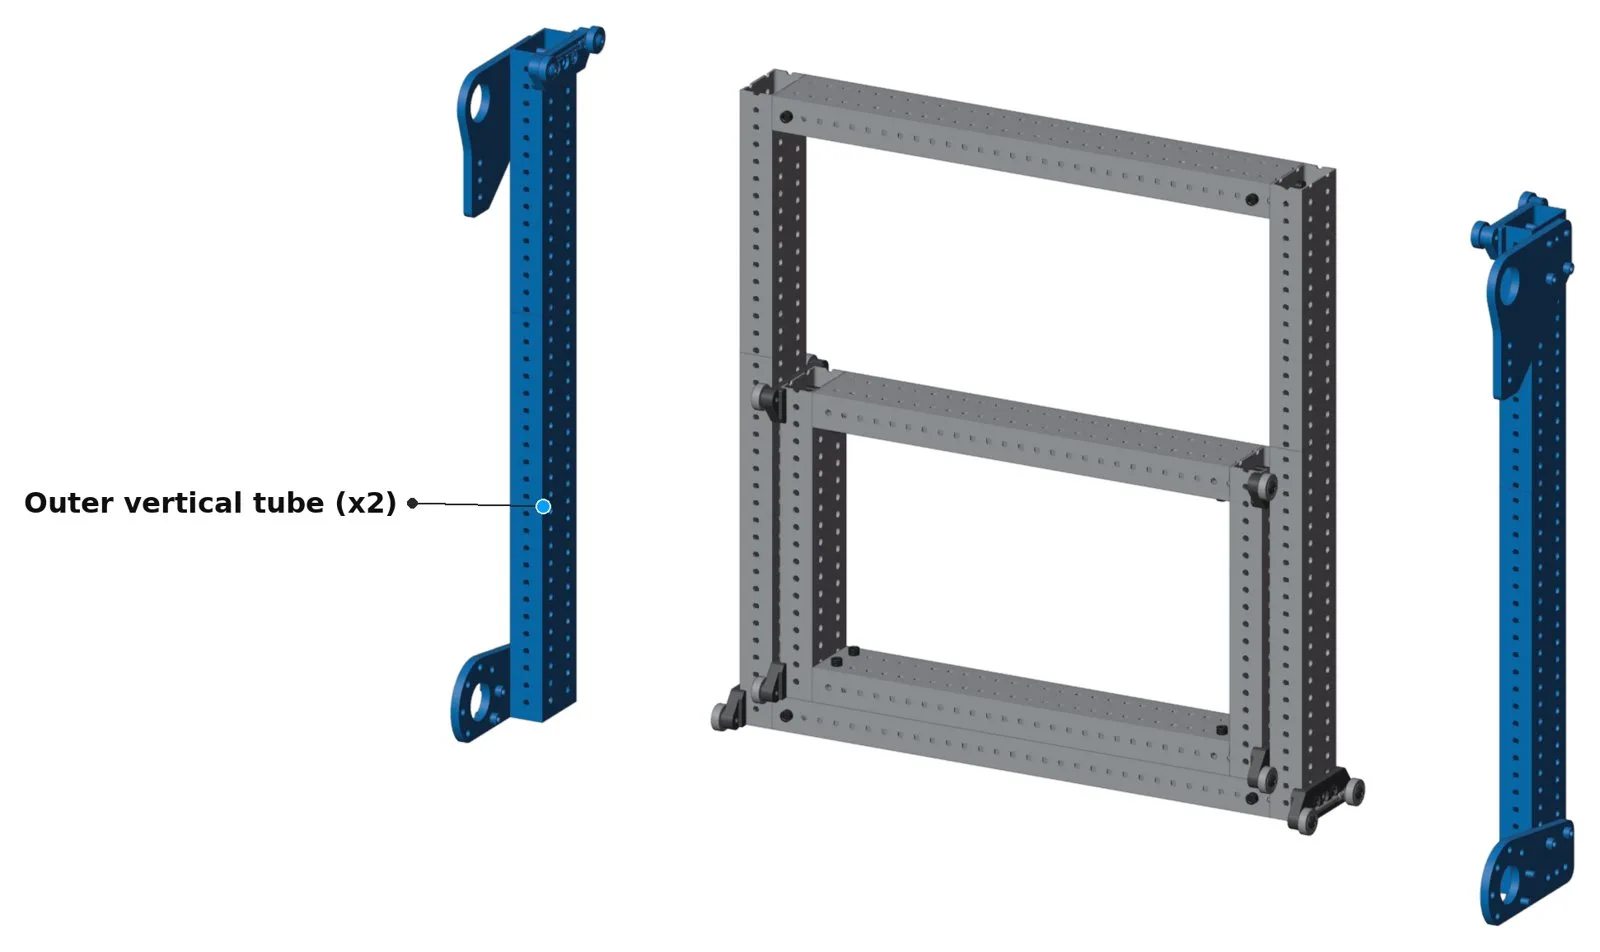
- Slide each outer vertical tube onto the bearing block at the bottom of the middle vertical tube first.
- Then guide the top of the middle vertical tube into the bearing block at the top of the outer tube.
Sliding it on is easier than pushing it straight in. If a bearing block screw backs out while you do this, push it back in.
Step 10. Outer bottom and top tubes
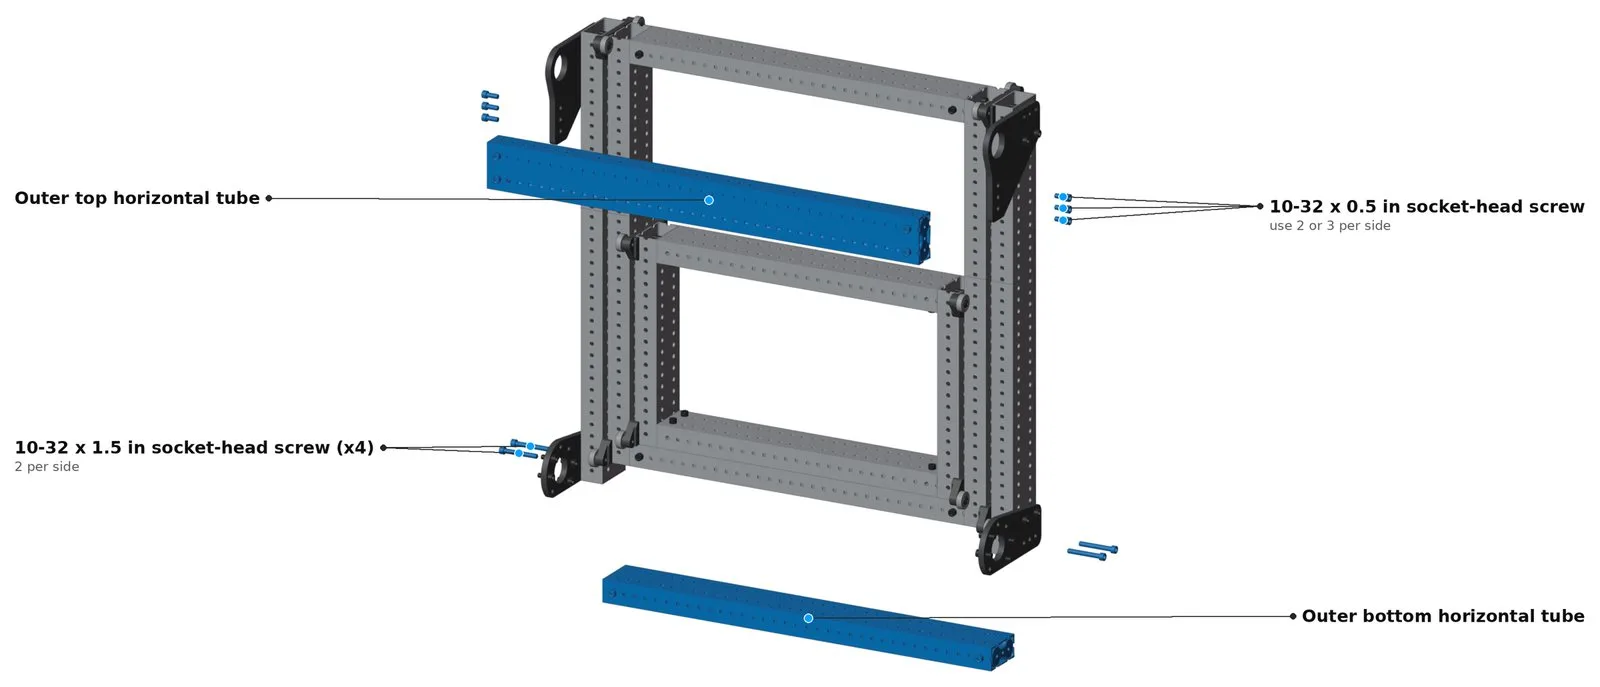
- Bottom tube: put it between the bottom plates. Put four 10-32 x 1.5 in socket-head screws through the non-threaded holes in the bottom plates and the vertical tubes, into the end caps. Use two per side.
- Top tube: put it against the top mount plates. Screw it on through the plates' non-threaded holes into the end caps with 10-32 x 0.5 in socket-head screws. There are three holes per side. Two per side is enough.
If there's a gap at the top, a bearing block is sticking out. Push it back in before you tighten.
The middle stage and carriage should now slide in and out with no wiggle.
Rope pulleys
Step 11. Build the pulleys
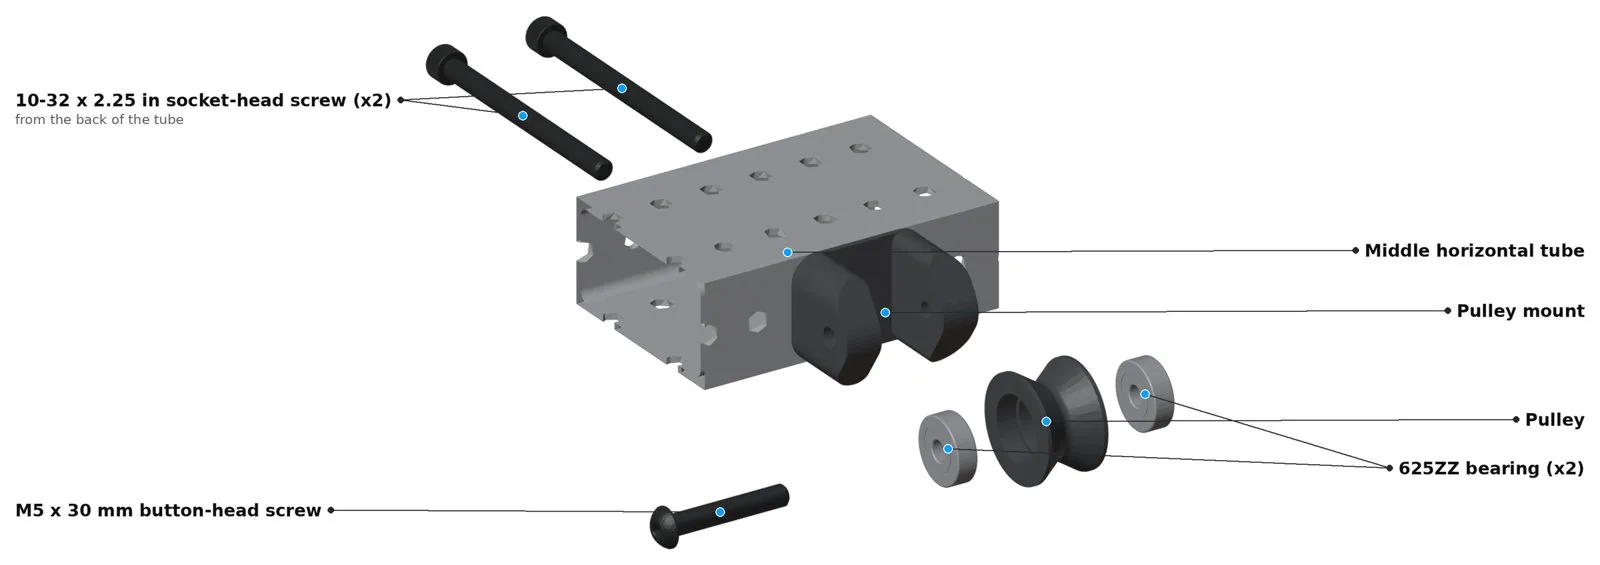
- Start a 625ZZ bearing into one side of a pulley, then press it in with a vise or arbor press until it's flush. Do the same on the other side.
- Set the pulley in the pulley mount.
- Put an M5 x 30 mm button-head screw with Loctite through the non-threaded hole, through the pulley, and into the threads on the other side.
- Spin the pulley. If it drags, back the screw off a little until it spins freely.
Build 4 pulleys.
Step 12. Mount the pulleys
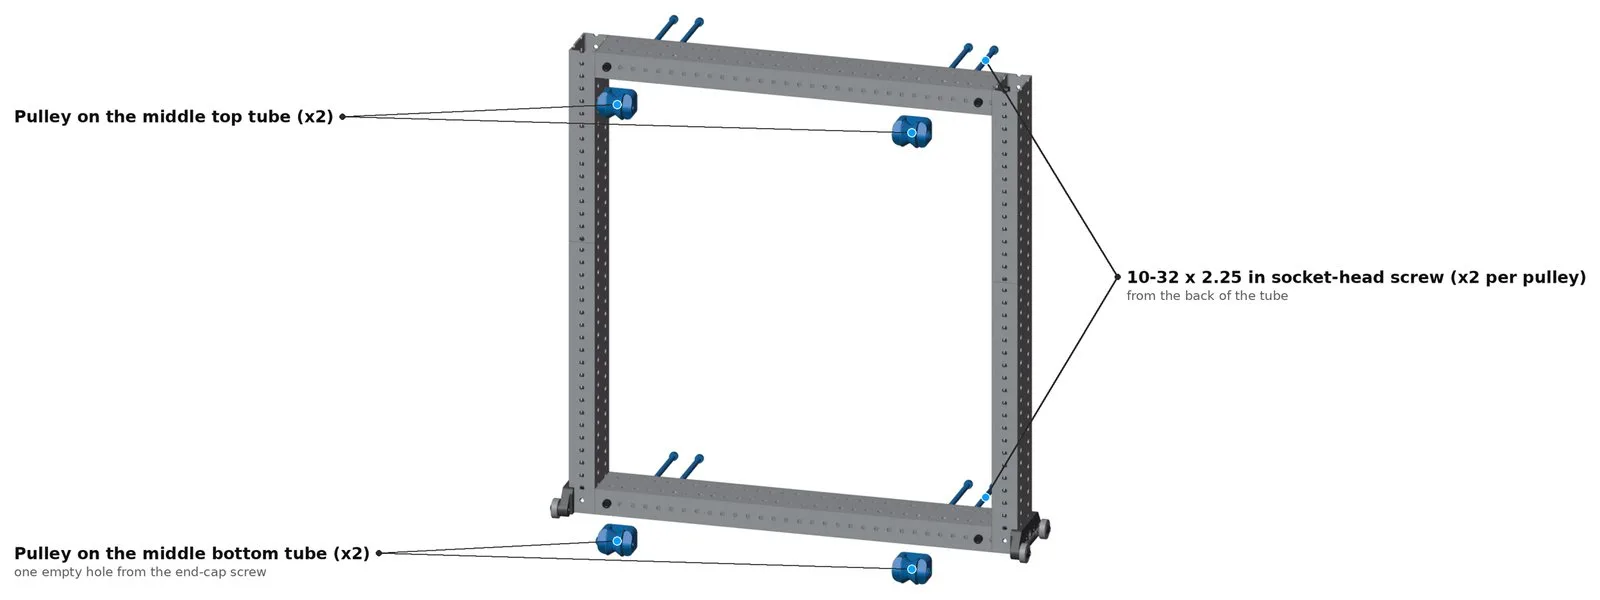
Mount two pulleys on the bottom middle horizontal tube and two on the top middle horizontal tube, one near each end.
- Count in from the end of the tube: the end cap screw hole, then one empty hole, then the pulley mount.
- Fix each mount with two 10-32 x 2.25 in socket-head screws from the back of the tube.
Carriage rope clamps
Step 13. Rope clamp plates on the carriage
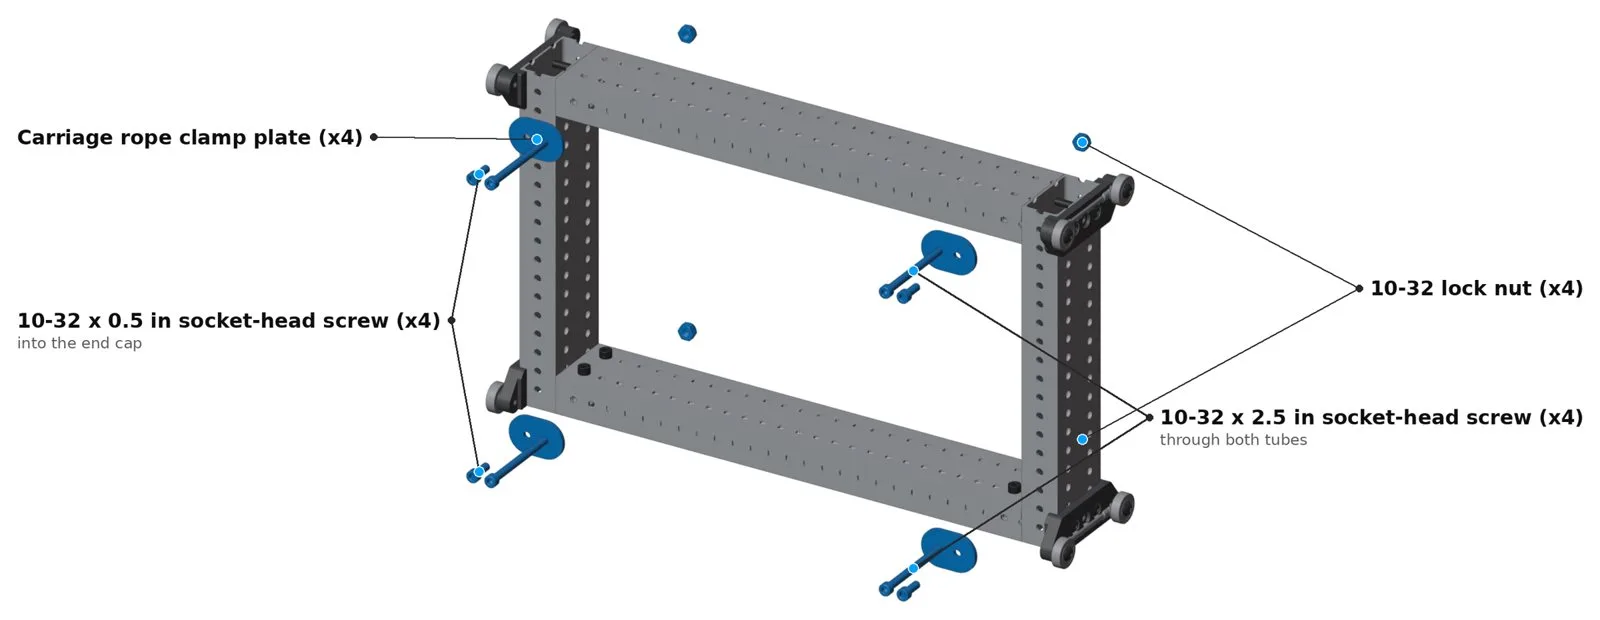
Put a carriage rope clamp plate at each corner of the carriage (4 total).
- Fix one hole of each plate into the end cap with a 10-32 x 0.5 in socket-head screw.
- Put a 10-32 x 2.5 in socket-head screw through the other hole and all the way through the tube, and thread a lock nut on by hand.
Leave all of these loose, with a small gap under each plate. The rope gets threaded under them later.
Axles and sprockets
Step 14. Axle supports and hex bearings
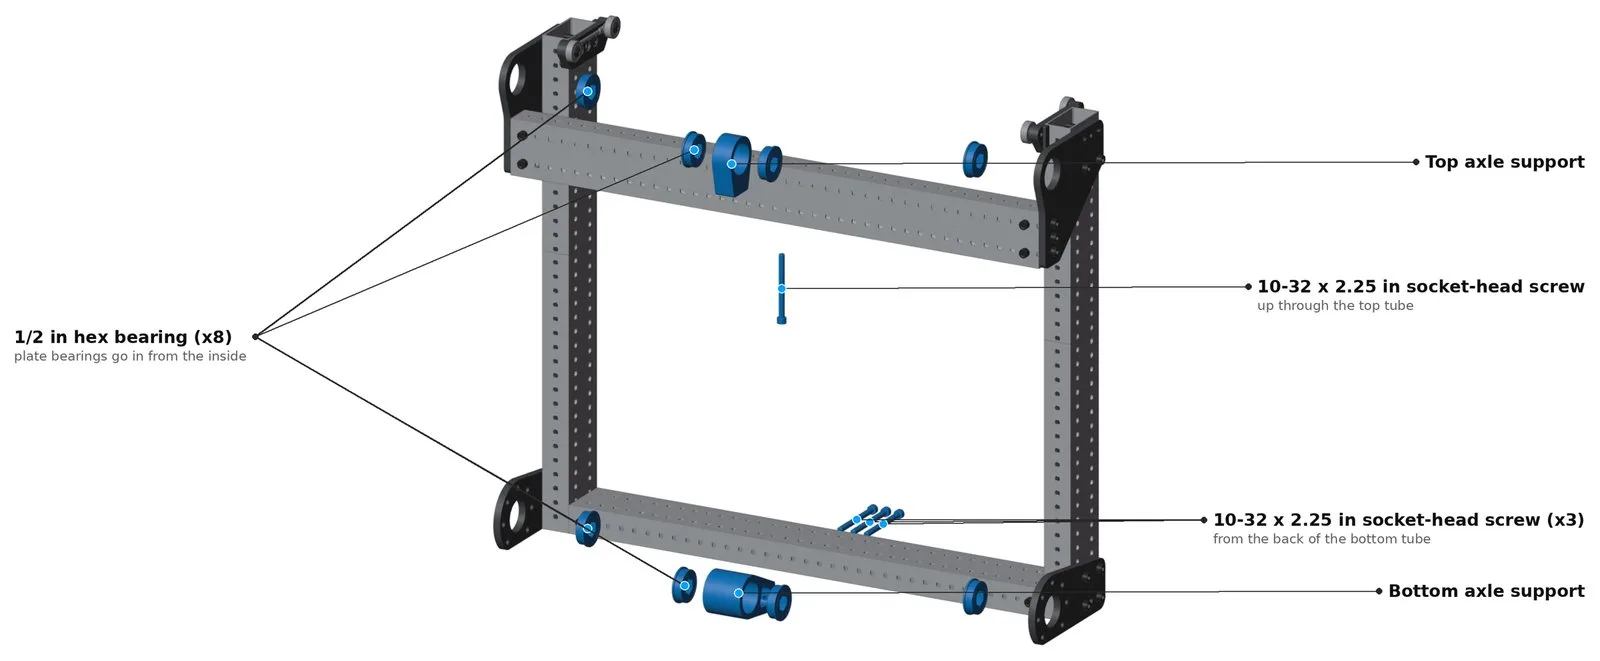
- Push a 1/2 in hex bearing into the axle hole of each of the four outer plates, from the inside of the plate.
- Push two hex bearings into each axle support, one from each side.
- Bottom axle support: put it on the front of the outer bottom tube, in the middle. Fix it with three 10-32 x 2.25 in socket-head screws from the back of the tube, into the threads in the support.
- Top axle support: put it on top of the outer top tube, in the middle. Fix it with one 10-32 x 2.25 in socket-head screw up through the tube from below.
Step 15. Sprockets
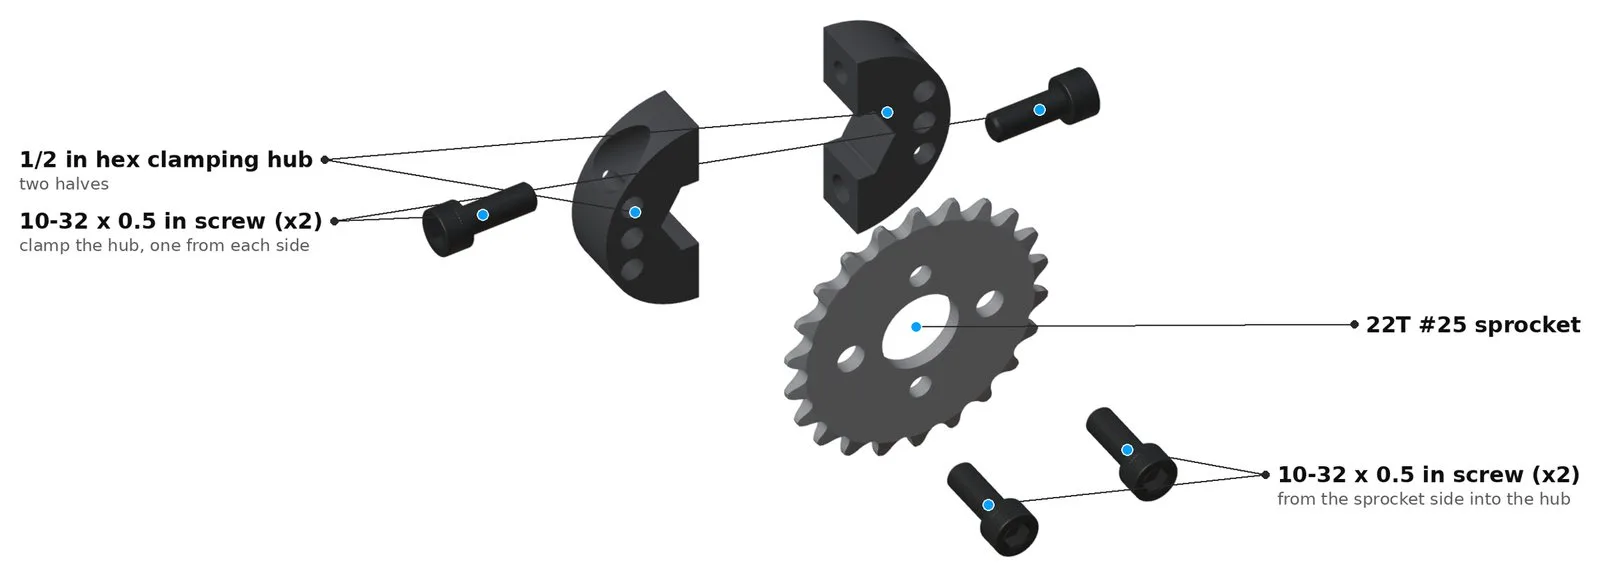
Three of the four sprockets are fixed to a clamping hub:
- Put the two halves of a clamping hub together and start the two 10-32 x 0.5 in screws that clamp it, one from each side. Leave them loose for now.
- Fix the 22T sprocket to the hub with two 10-32 x 0.5 in screws, put in from the sprocket side.
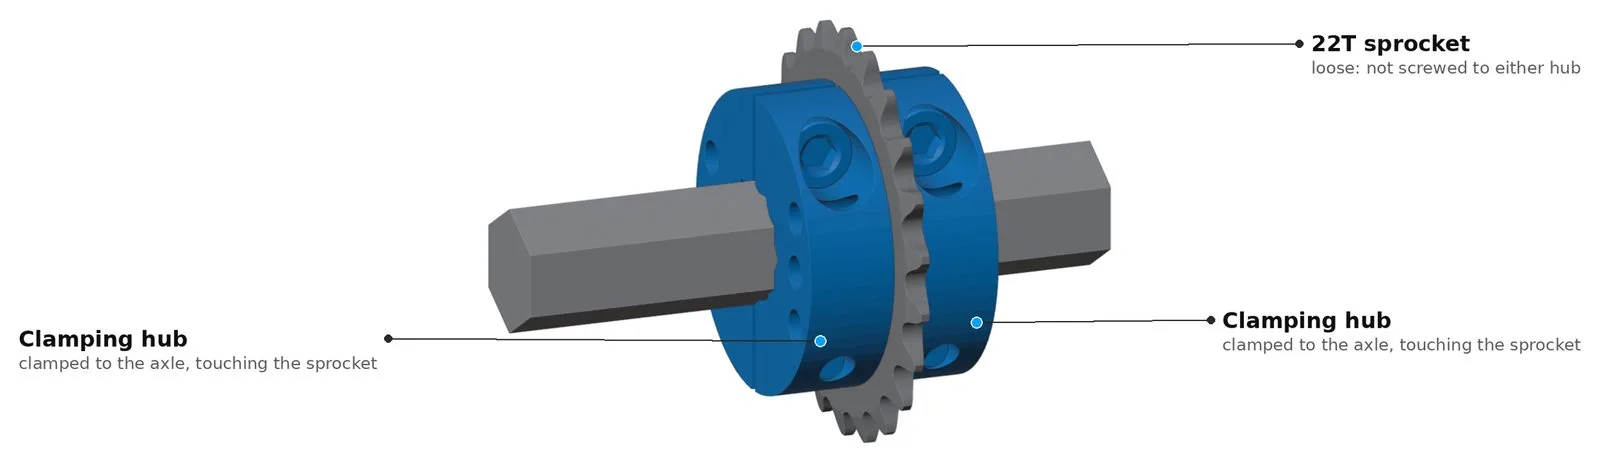
The top-left sprocket is different. It isn't screwed to anything. It sits loose on the axle between two clamping hubs, with a hub touching each side. That lets it turn on its own so the two chains share the load evenly.
Step 16. Bottom axle

The bottom axle is the drive input. Your gearbox goes on the bottom (motor mount) plate.
- Cut a 1/2 in hex axle so its ends sit flush with the outside of the bearings in the two bottom plates.
- Hold the parts in line in this order, left to right: shaft collar, sprocket and hub, shaft collar, the bottom axle support, shaft collar, sprocket and hub, shaft collar.
- Slide the axle in from one side, through the plate bearing and each part, until it comes out through the bearing in the other plate.
- Slide the shaft collars against the plate bearings and the support bearings and tighten them.
- Line each sprocket up with the chain attach block above it (step 18), then tighten the hub clamp screws.
Step 17. Top axle

Same as the bottom axle: hold the parts in line, then slide the axle in from one side through the top mount plates and the top axle support.
On the left side, the order is clamping hub, sprocket (loose), clamping hub. Push both hubs against the sides of the sprocket and tighten them on the axle, but don't screw the sprocket to either hub.
Chains
Step 18. Chain attach blocks
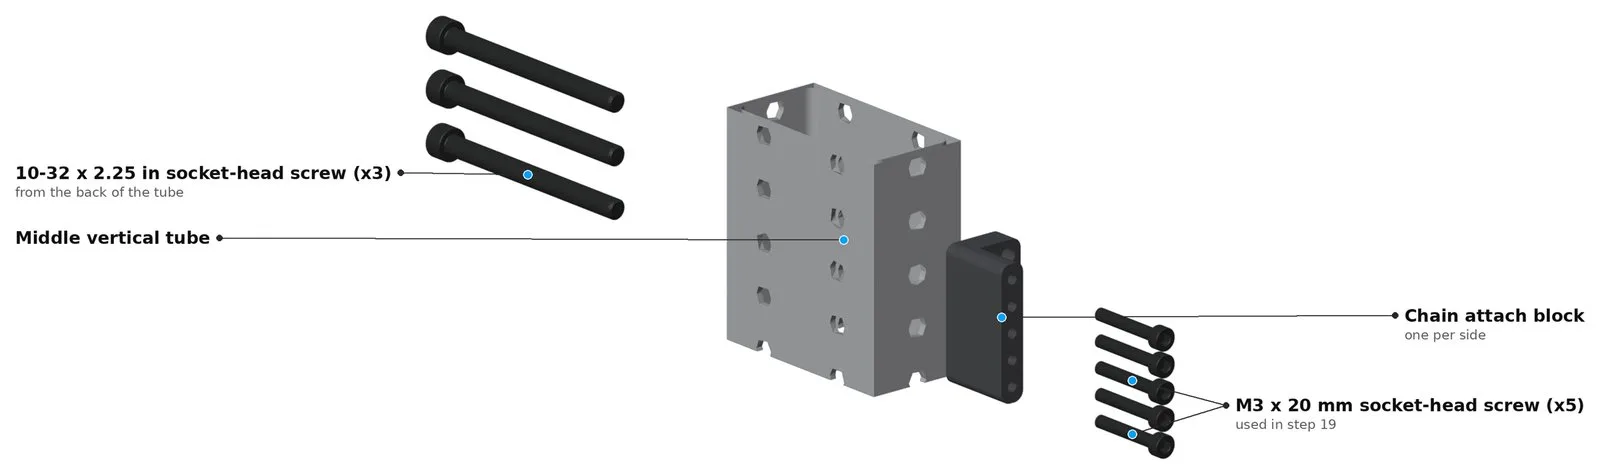
There are two chain attach blocks, one for each side. The right one is a mirror image of the left.
- Put a block on the front of each middle vertical tube, near the bottom.
- Fix each with three 10-32 x 2.25 in socket-head screws from the back of the tube, into the threads in the block.
Step 19. Chain on both sides
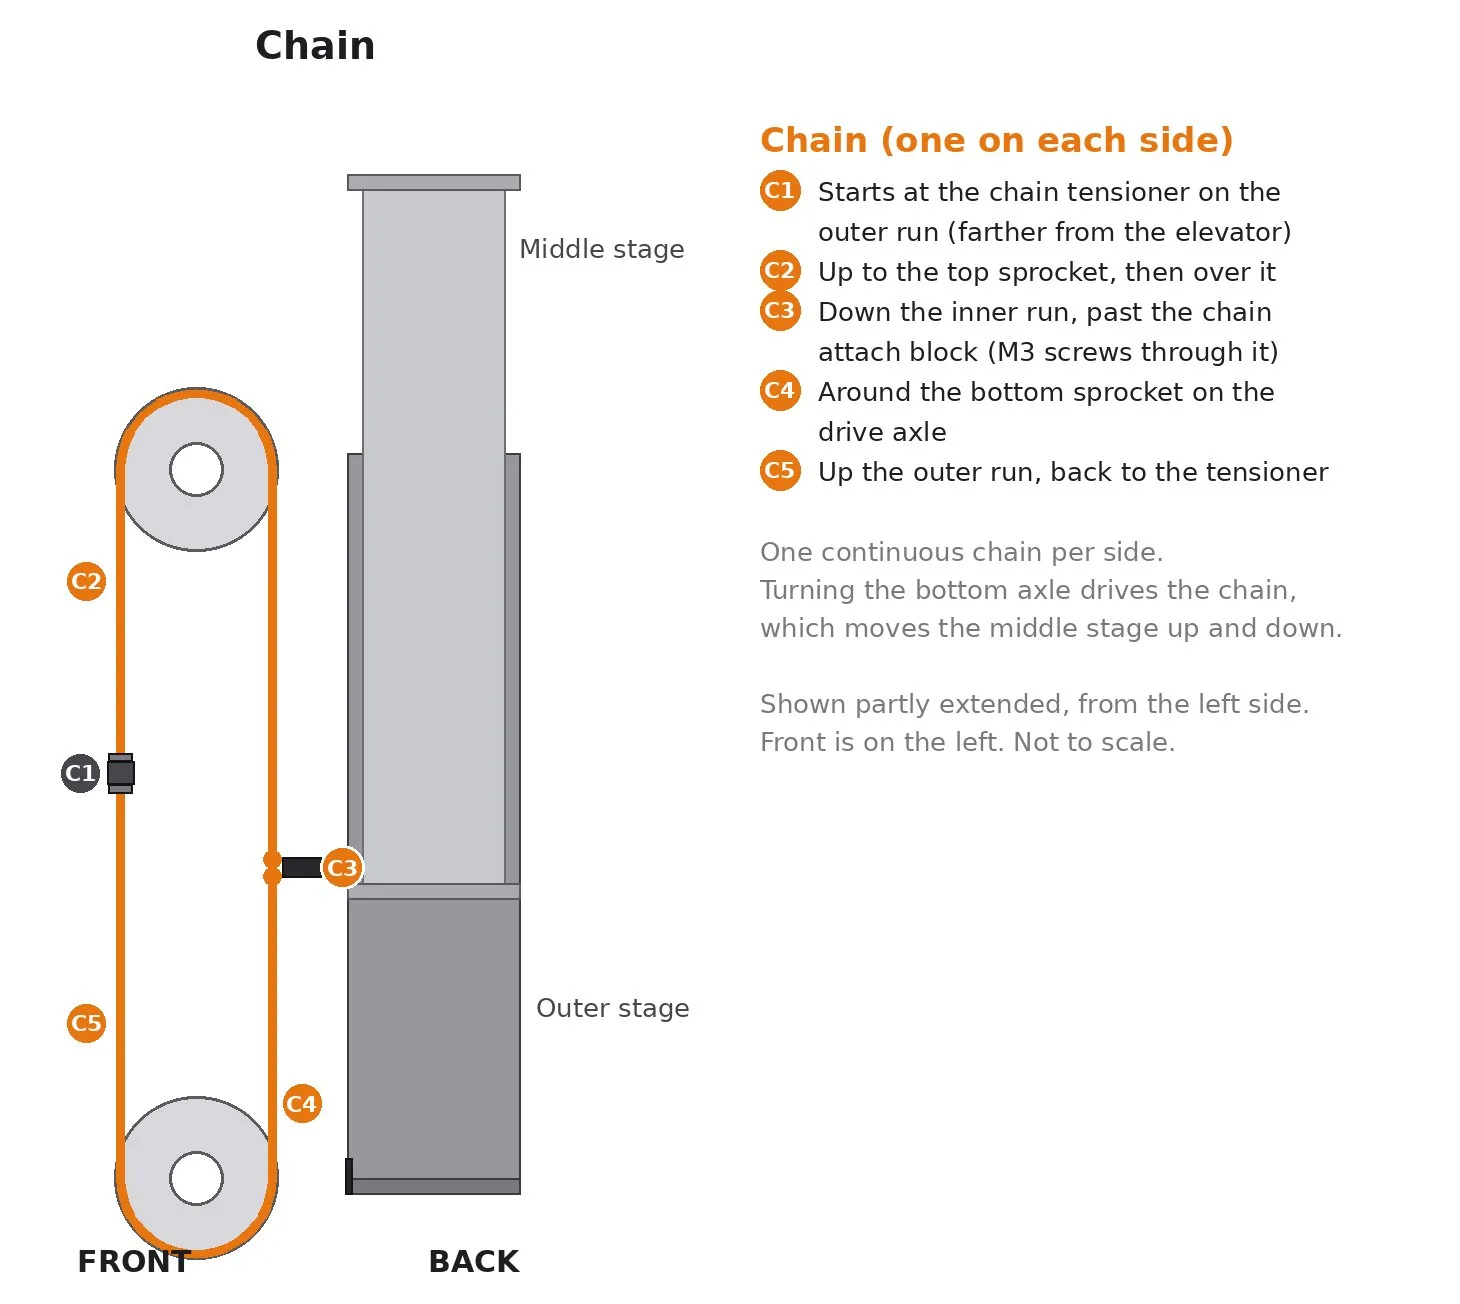
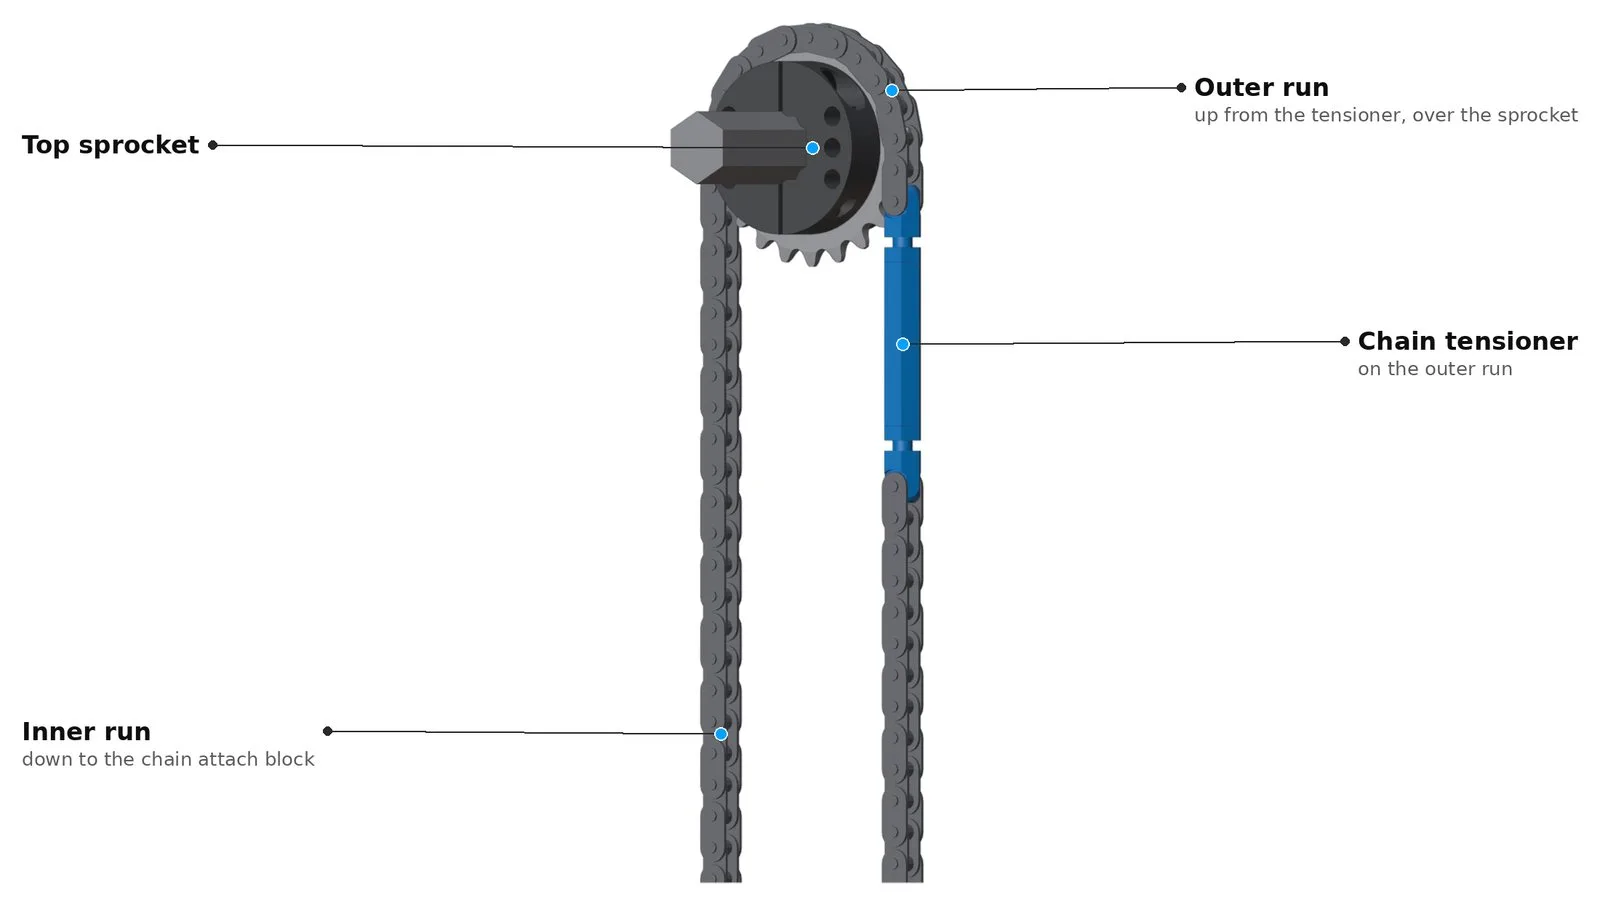
Do this on each side with the middle stage all the way down. The inner run is the side of the chain closest to the elevator. The outer run is the side farther away.
- The chain starts and stops at the chain tensioner, on the outer run. With the elevator all the way down, put it almost touching the top sprocket. It moves down as the elevator goes up.
- From the tensioner, run the chain up to the top sprocket and over it, down the inner run past the chain attach block, around the bottom sprocket, and back up the outer run to the tensioner. It's one continuous piece.
- Cut the chain to length with a chain tool. Join each chain end to one end of the tensioner with a master link. The flat end of the tensioner goes between the master link plates, and the link's pin goes through the hole in the end.
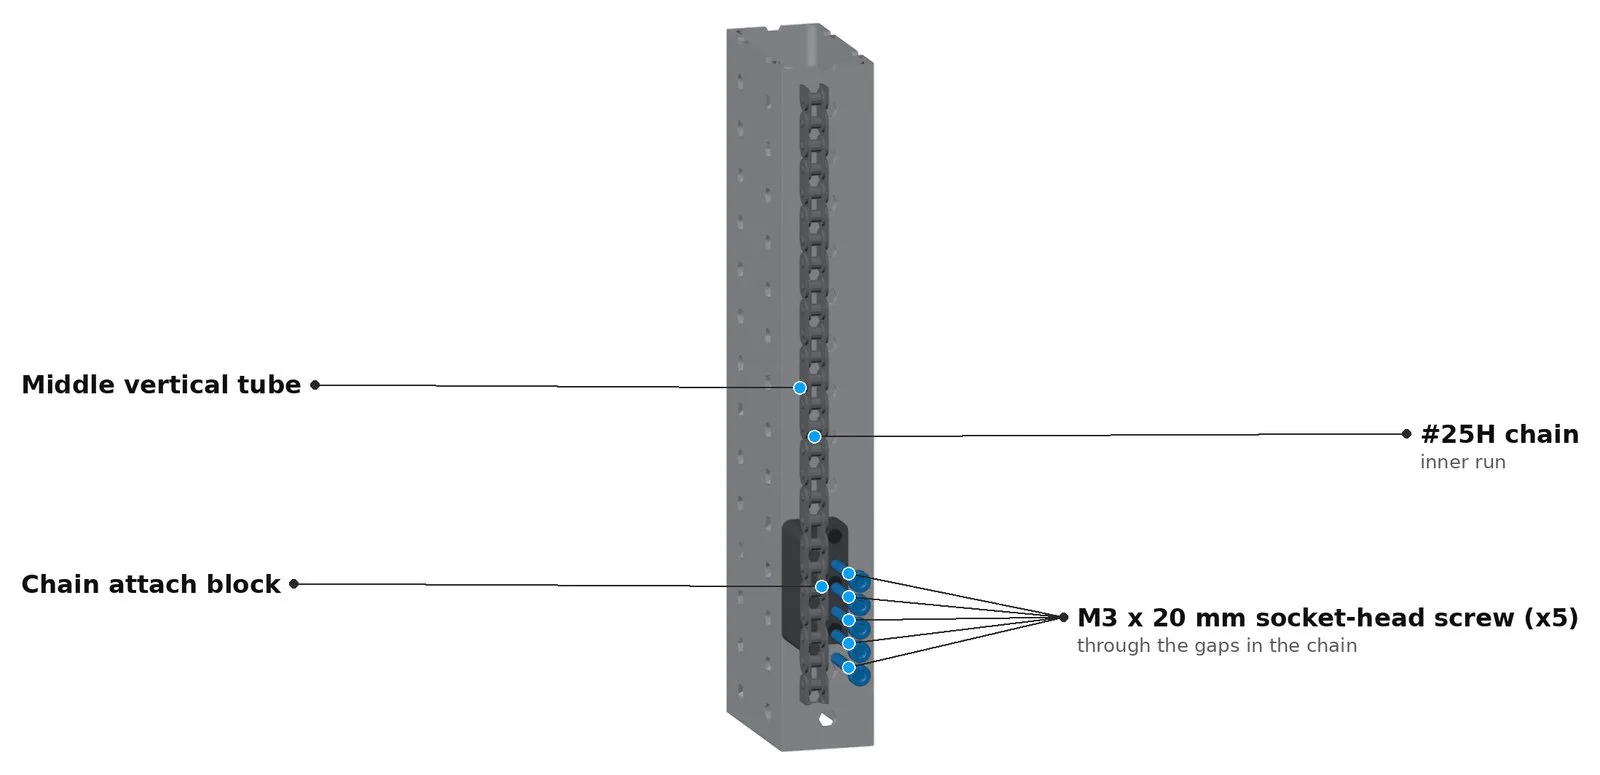
- Lay the inner run on the front of the chain attach block. Put five M3 x 20 mm screws through the gaps in the chain and into the block.
Step 20. Chain tension
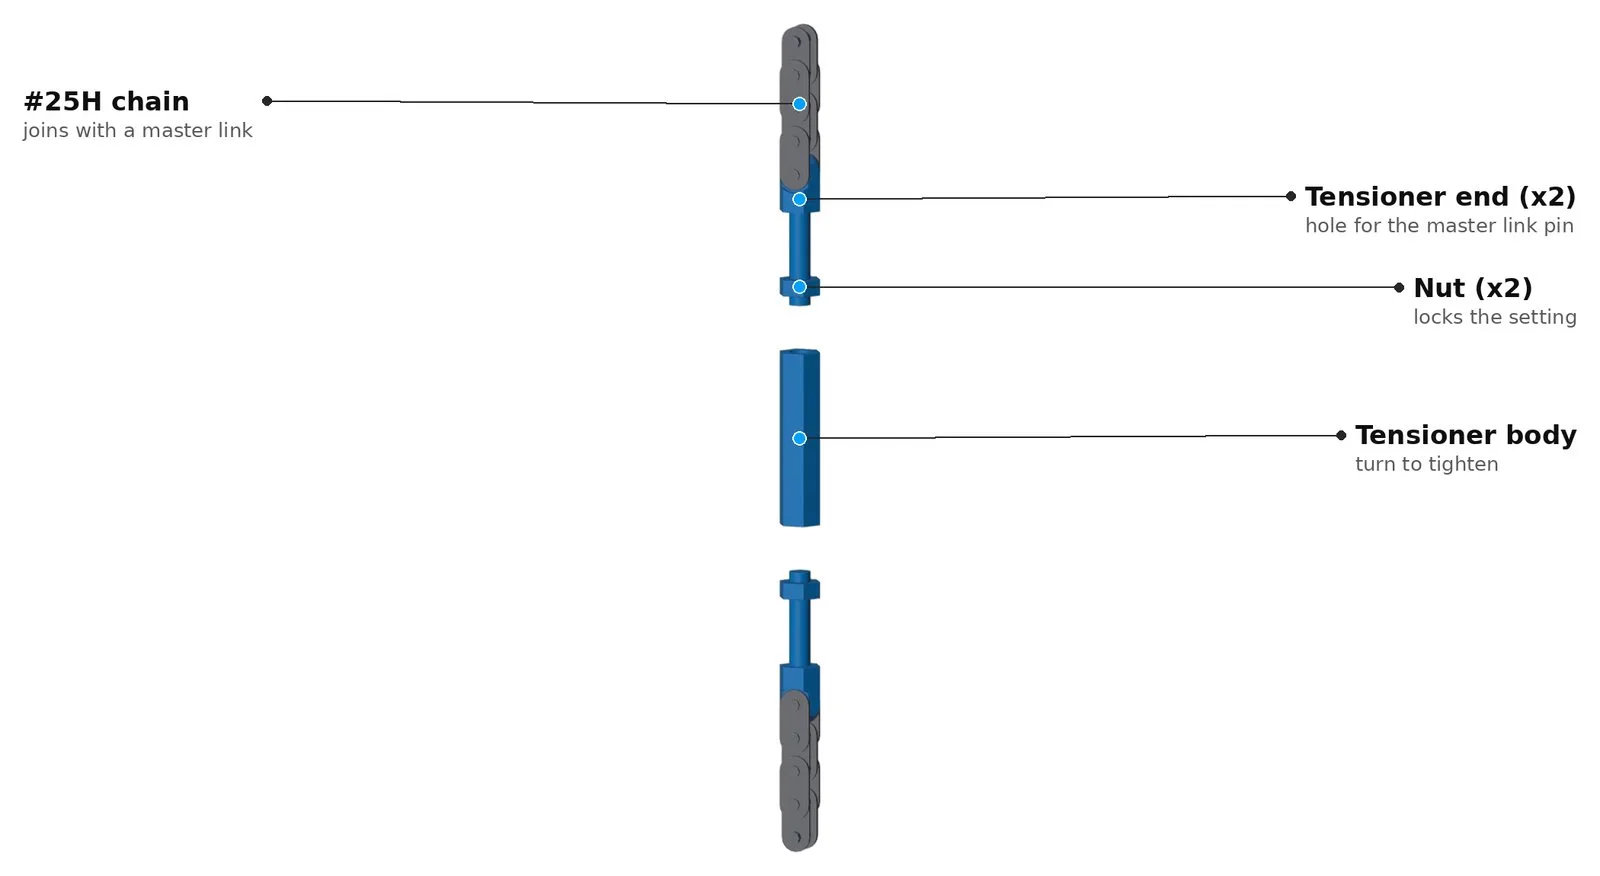
The tensioner is a body with an end threaded into each side and a nut on each end. Turn the middle standoff to tension the chain. Both ends move in or out together (one end is left-hand threaded).
- Loosen both nuts.
- Turn the body with a 7 mm wrench to pull the two ends in, until the chain has no slack. Don't over-tighten it.
- Keep both ends flat in line with the chain, then tighten each nut against the body.
Get both chains to about the same tension. Check that each chain runs straight from sprocket to sprocket. If it doesn't, loosen that hub, slide the sprocket into line and tighten it again.
Ropes
Step 21. Outer rope clamp plates
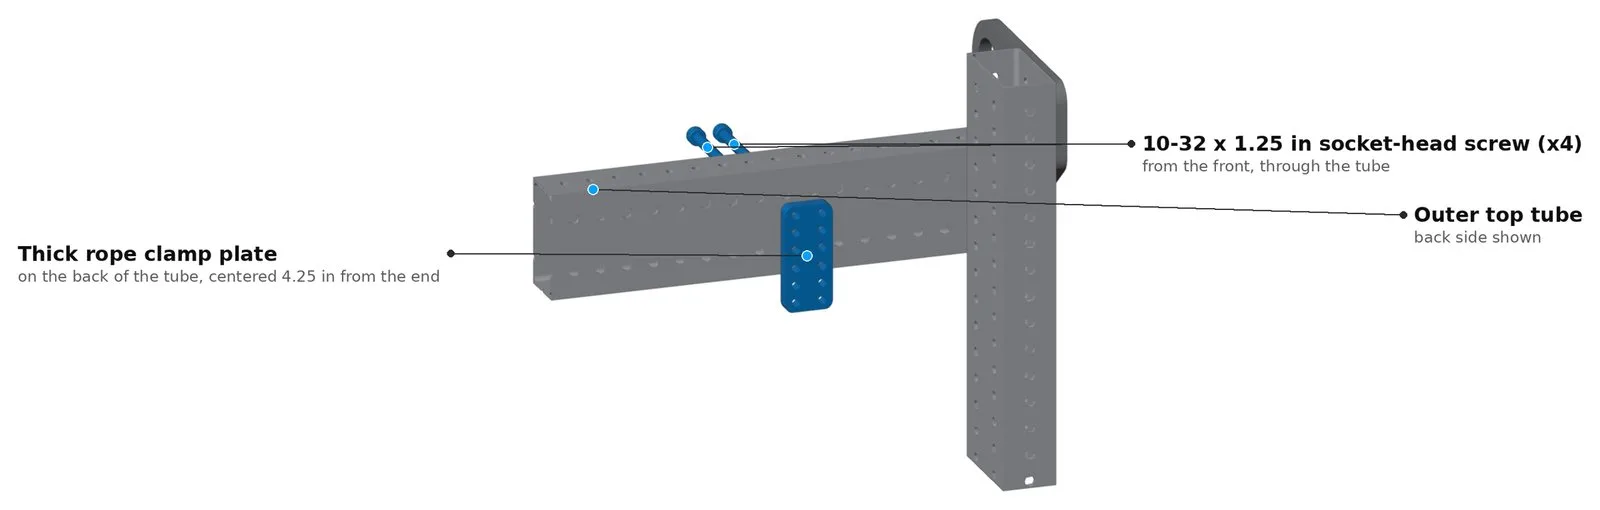
There's one set on each side of the outer top tube.
- Put the thick rope clamp plate against the back face of the outer top tube, centered 4.25 in from the tube end. Start four 10-32 x 1.25 in socket-head screws from the front, through the tube and into the plate. Leave them loose for now.
- Start the eight 10-32 x 0.375 in socket-head screws that hold the thin rope clamp plate on the thick plate. Leave room for the rope between the plates. Don't clamp the rope until after the zip ties are tight in step 23.
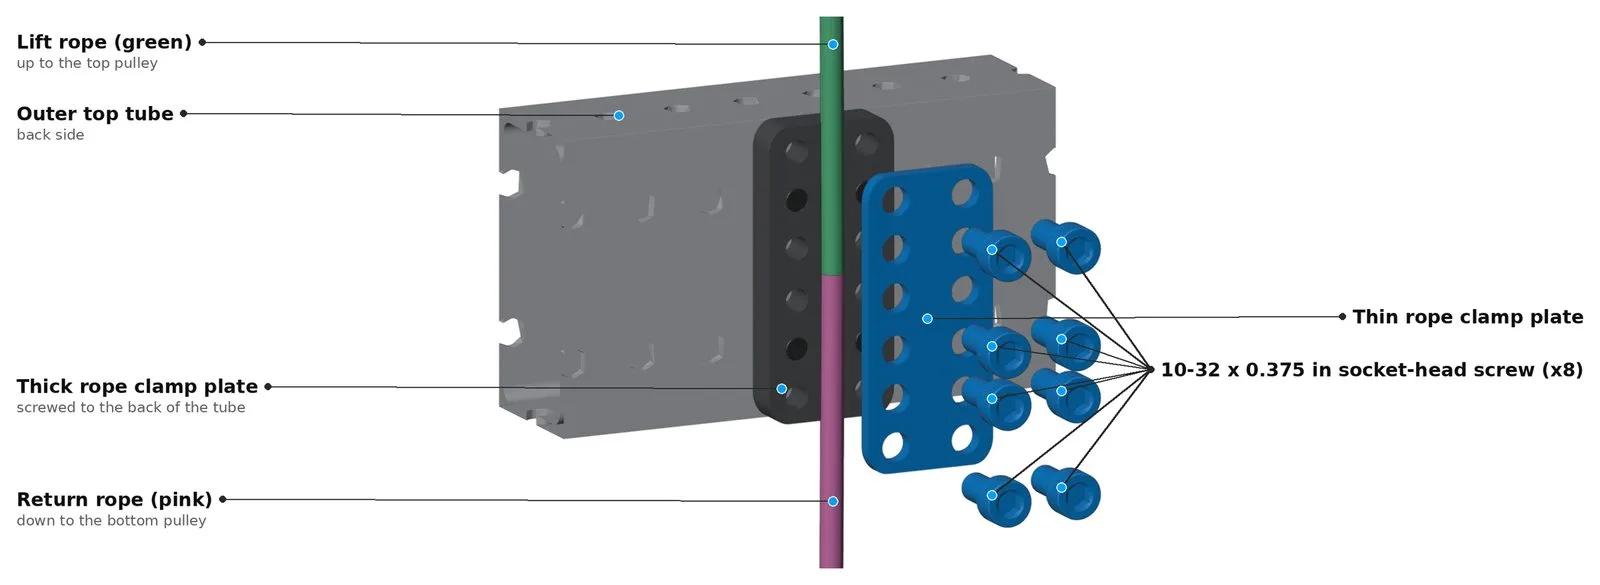
Step 22. Route the ropes
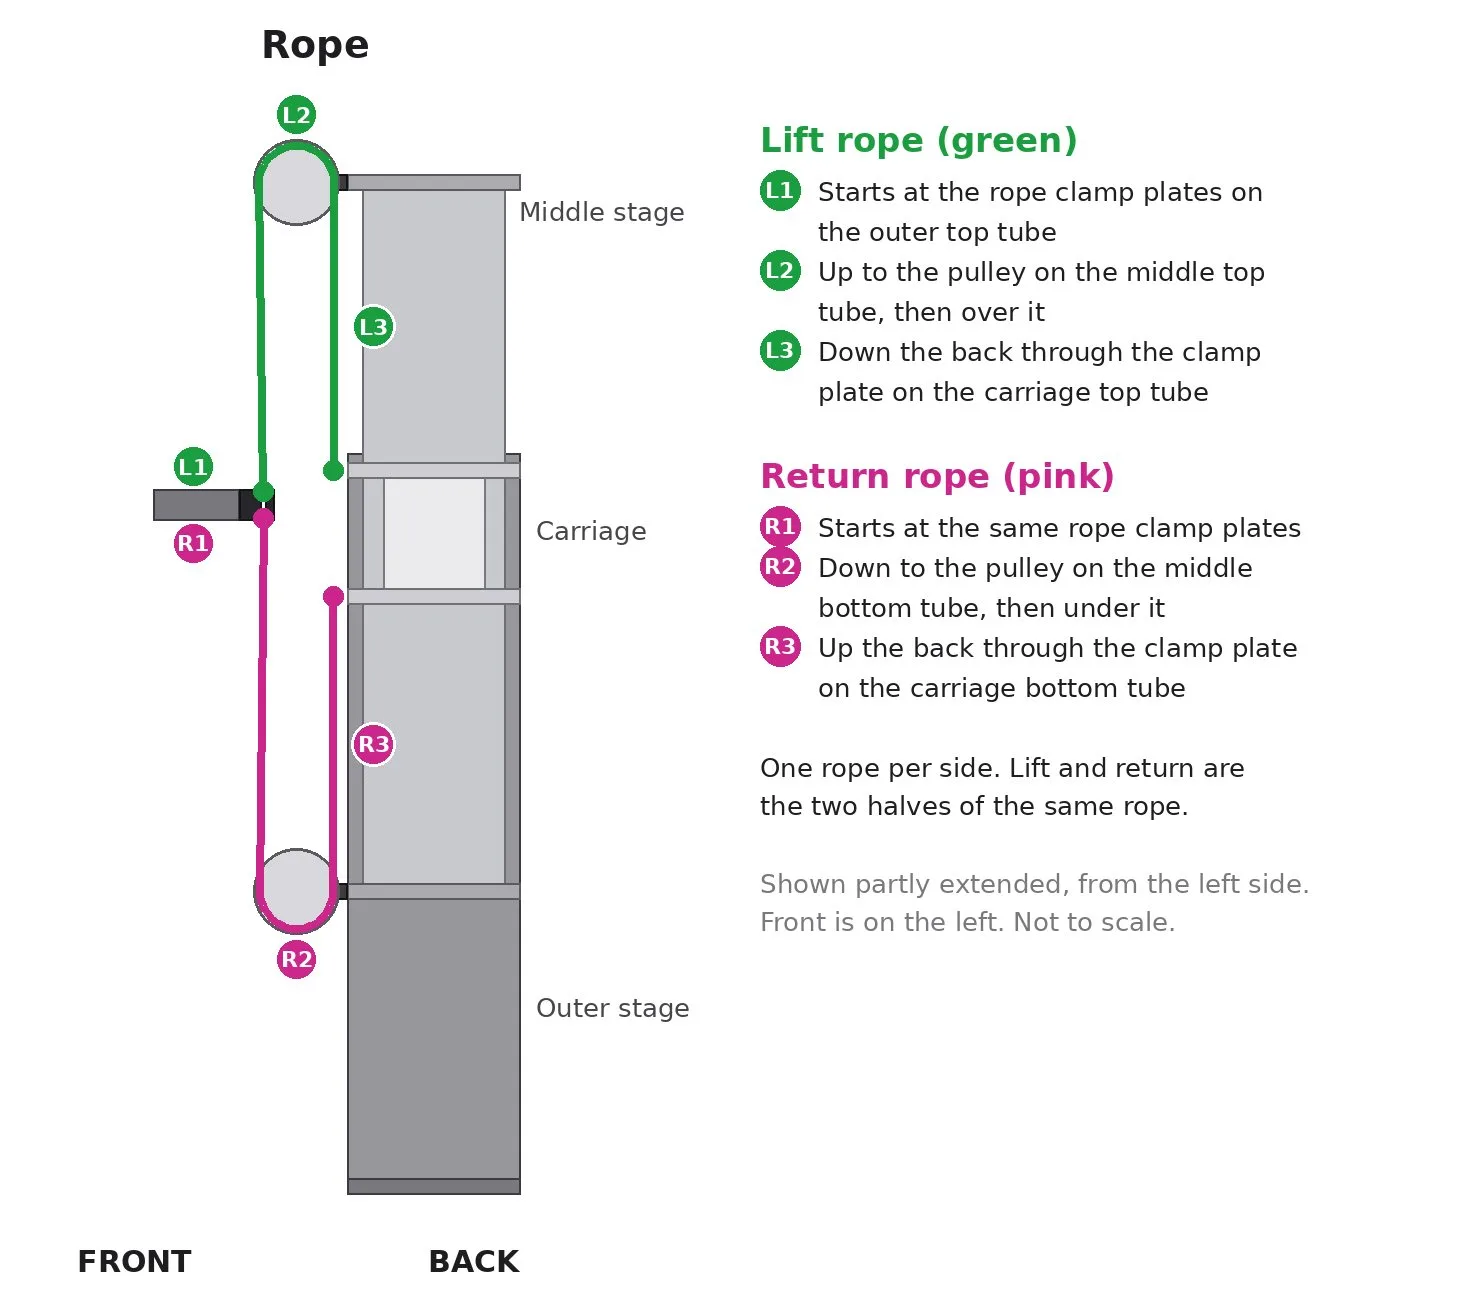
Cut the rope into two equal pieces, one for each side. Each rope has two halves: the lift half (green) and the return half (pink).
- Put the middle of the rope between the outer clamp plates, running up and down. Leave the plates loose so the rope can slide.
- Lift (green): take the top half up to the pulley on the middle top tube, over it, and down the back to the carriage top tube.
- Return (pink): take the bottom half down the front of the middle stage, under the pulley on the middle bottom tube, and up the back to the carriage bottom tube.
- At each carriage tube, pass the rope under the carriage rope clamp plate, between its two screws. Keep the clamp plates loose enough that the rope slides freely. Leave the end long enough to tie a loop.
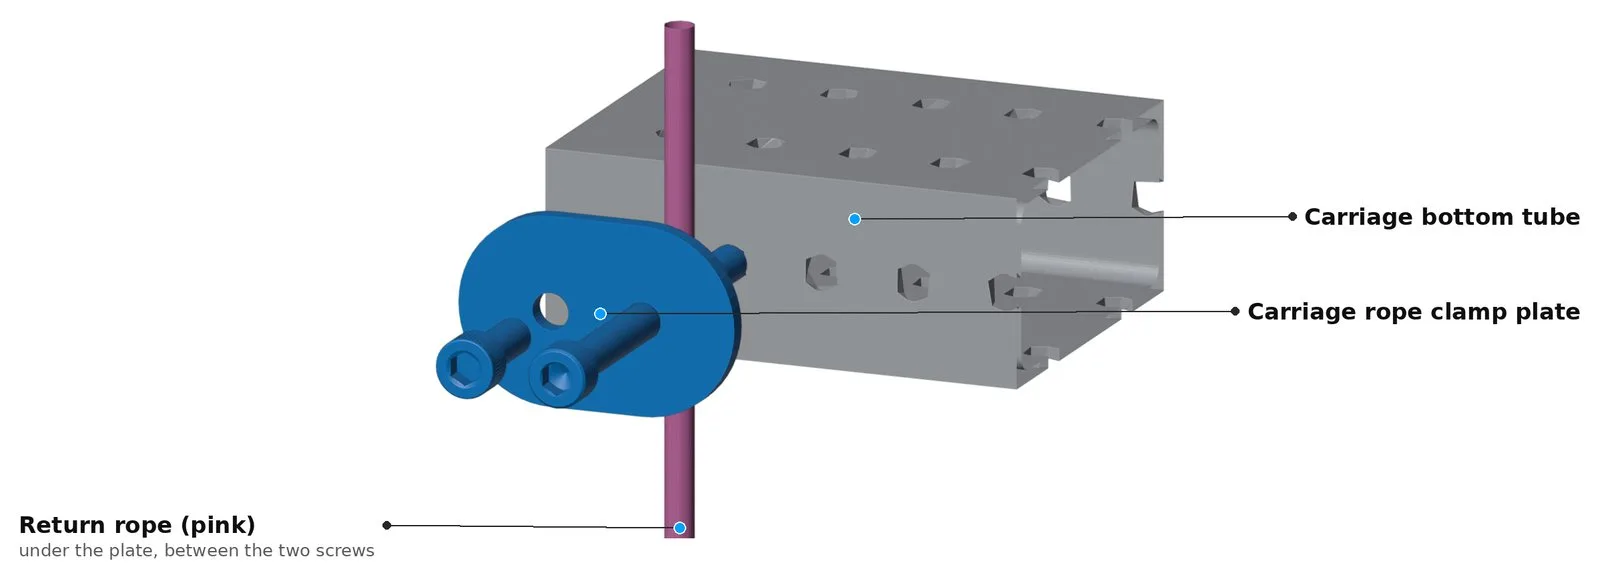
Step 23. Tension the ropes
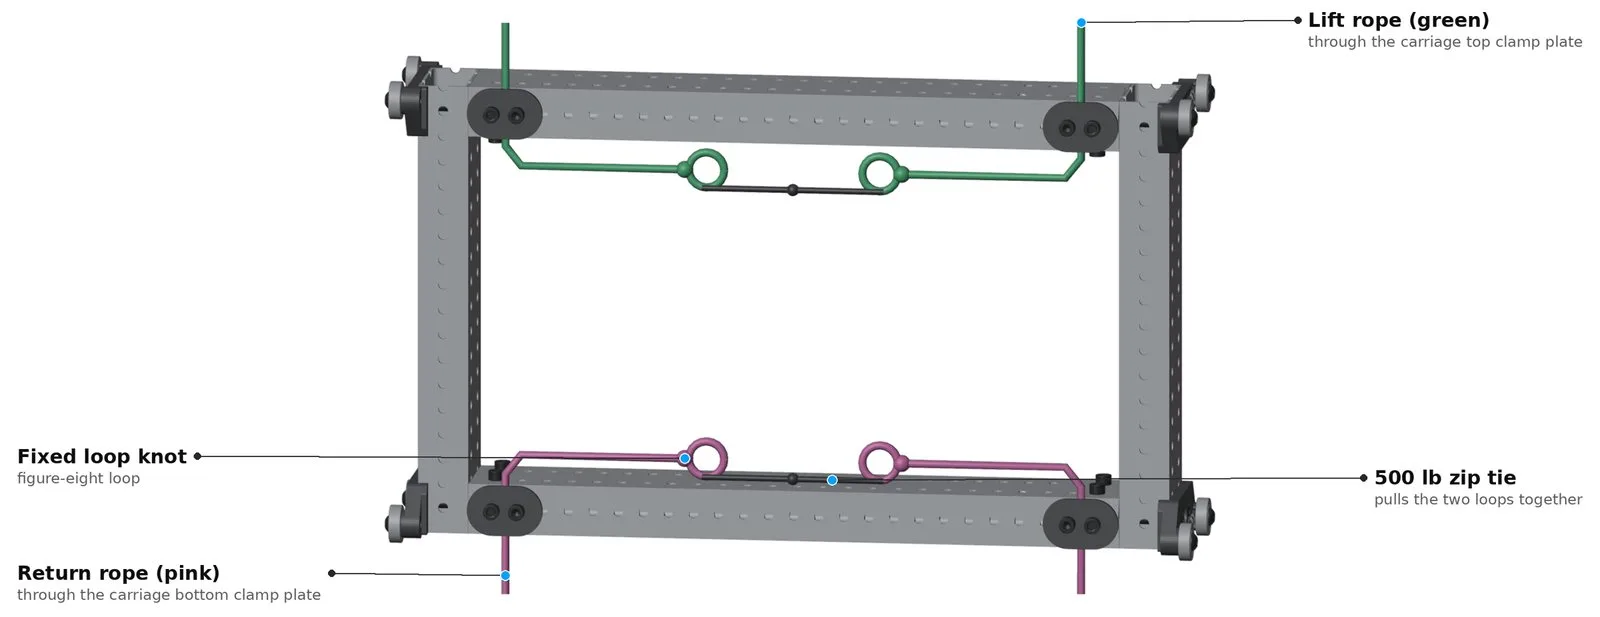
Start with the middle stage and the carriage all the way down.
- Tie a fixed loop in the end of each rope, as close to its carriage clamp plate as you can.
- Carriage top tube: put one of the 500 lb zip ties through the left and right lift rope loops. Pull it tight to tension both lift ropes.
- Carriage bottom tube: do the same with the two return rope loops.
- Fully tighten the four carriage rope clamp plates.
- Tighten the four 1.25 in screws that hold each thick outer clamp plate to the tube. Then tighten the eight 0.375 in screws on each thin outer clamp plate to clamp the rope.
If you have extra rope and the loops end up too close together to tension, wrap the rope around the clamp plate's two screws before you tie the loop. That takes up slack and leaves more room for the zip tie. This is mostly needed on narrow elevators.
How to tie a figure-eight loop:
- Fold the end of the rope back on itself so you're holding it doubled.
- Cross the folded end over the doubled rope to make a loop.
- Take the folded end around behind the doubled rope, then push it down through the loop from the front. It should look like an 8.
- Pull the folded end out to the loop size you want, then pull all the strands tight.
Step 24. Final check
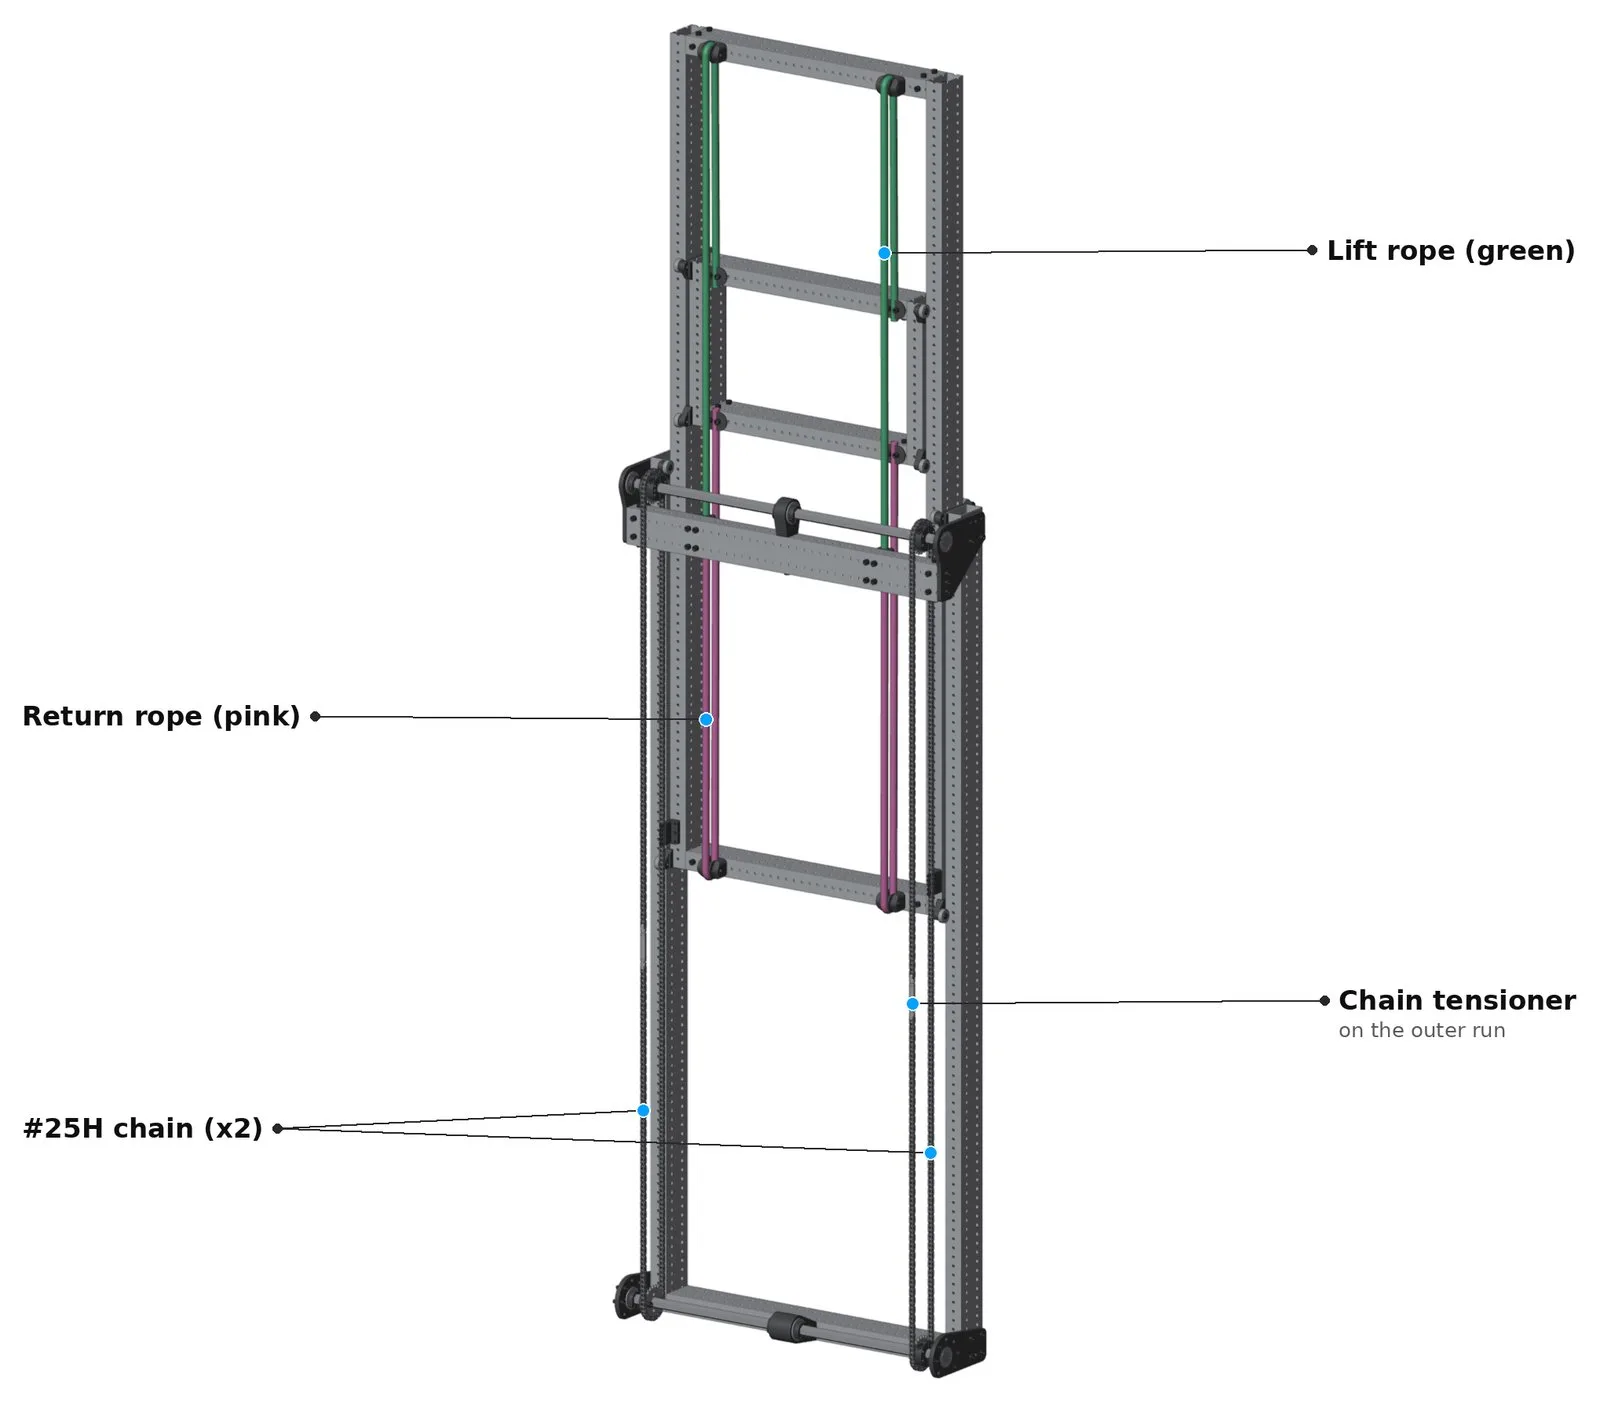
Turn the bottom axle by hand and run the elevator all the way up and back down.
- The carriage moves at the same time as the middle stage.
- Both chains and both ropes stay tight, all the way up and all the way down.
- Nothing rubs or catches.
- All screws are tight.
Common mistakes
- Carriage end cap screws facing out. They must face the inside of the carriage, or the carriage hits the top and bottom of the elevator.
- End cap screws on the top or bottom of the middle and outer horizontal tubes. These go in the sides.
- Bearing blocks upside down. On the carriage, the bearings face up.
- Top middle tube on before the carriage. The carriage has to slide in first.
- Lock nuts on the outside. The lock nuts for the plates go inside the tube. The plate goes on the outside.
- Plates not mirrored. The two outer vertical tubes are mirror images. The flat edge of each bottom plate goes at the bottom.
- Pressing pulley bearings in by hand. They can go in crooked and are very hard to get back out. Use a vise or arbor press.
- Pulley screw too tight. Back it off until the pulley spins freely.
- Rope clamp plates tightened too soon. Leave the outer and carriage clamps loose until the zip ties are tight. Tighten the outer clamps last.
- Clamping the top-left sprocket to a hub. It must sit loose between its two hubs so the chains share the load.
- Sprocket not lined up with the chain. Slide the sprocket on the axle until the chain runs straight to the block.
- Tensioner on the inner run. It goes on the outer run, the side of the chain farther from the elevator. The chain attach block is on the inner run.
- Chains at different tension. Adjust the tensioners until both are about the same.
- Tensioner nuts left loose. Tighten both nuts against the body after you set the tension, or it can unwind.